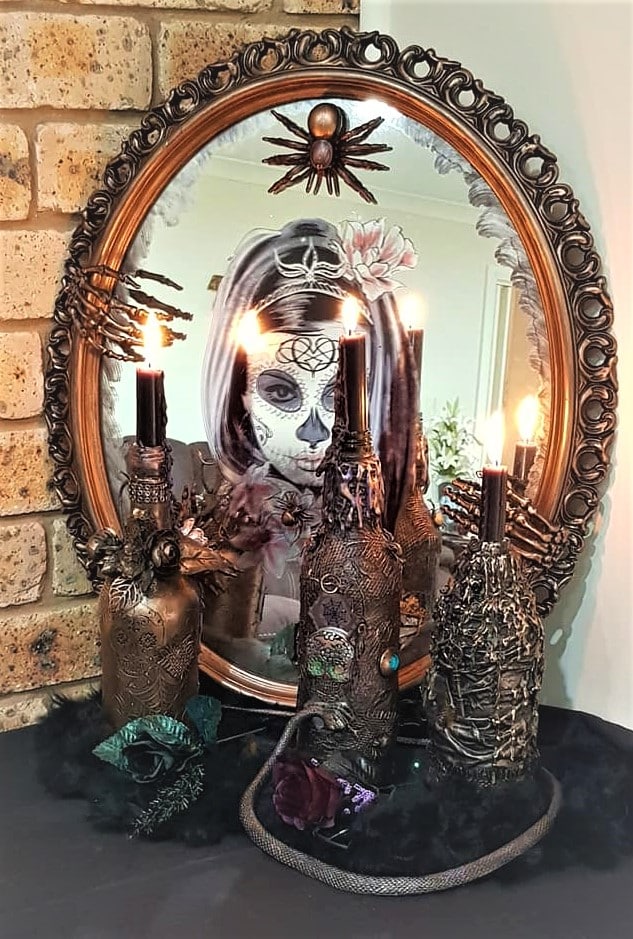
With Halloween fast approaching, it’s time to start thinking about how to decorate your home for the spookiest time of the year. I’ve always loved creating unique DIY Halloween projects, and this year, I wanted to do something a little different – a Halloween mirror featuring a reflection of a female sugar skull. I had an old, plain mirror lying around, and although the mirror itself wasn’t anything special, I loved the frame and saw potential for a spooky transformation. Using waterslide paper, I created a sugar skull image that, when placed on the mirror, would reflect at anyone who looked into it, giving the illusion of the skull staring right back at you.
This DIY project combines creativity and simplicity, offering you a fun way to make a striking Halloween statement piece that you can reuse every year. Let’s dive into how I turned this old mirror into a spooky reflection of a female sugar skull!

Before we dive into this tutorial, be sure to subscribe to my bimonthly newsletter to be the first to see my latest projects. You can also follow me on Pinterest and Facebook, where I also include my unique mixed-media art projects.
How to make a Halloween Mirror with a skull reflection
Materials Needed
- Old mirror with a plastic frame
- Black gesso
- Bronze wax paste
- Waterslide paper
- Inkjet printer
- Acrylic spray
- Hot glue gun
- Plastic spiders
- Skeleton hands (optional)
- Soft towel or cloth
- Heat gun (optional)
Step 1: Paint the Frame
I started by giving the frame a makeover. The first step was painting the frame with black gesso. Because the frame was plastic, gesso acted as a primer, ensuring better paint adhesion. After applying two coats of gesso, I decided not to use black acrylic paint, as the gesso already provided excellent coverage.

Step 2: Add the Bronze Wax Paste
This technique is perfect for highlighting raised details. Dip your finger into the bronze wax paste and gently rub it over the raised parts of the frame, leaving the black gesso untouched in the crevices. It’s an easy, no-fuss method, and if you make any mistakes, you can always wash the wax off and start again.

Step 3: Choose and Print the Halloween Image
No Halloween mirror would be complete without a scary element. I found a spooky image of this female sugar skull on Pixabay that seemed perfect for this project.
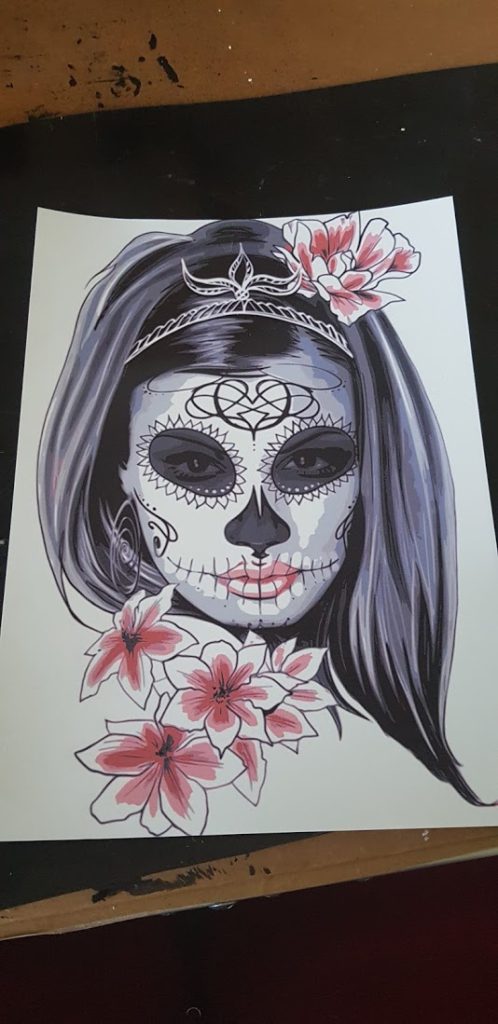
To transfer the image, I used waterslide paper, which is ideal for perfectly transferring inkjet images. Simply print the image using photo quality settings, and be sure not to touch the printed surface to avoid smudging.

Step 4: Seal the Image
To ensure the image transferred smoothly, I sealed it with two coats of acrylic spray. Allow each coat to dry before cutting the image close to the edge. The image’s clear background will show up in the mirror’s reflection, giving it an eerie look.

Step 5: Transfer the Image to the Mirror
This is the fun part! To transfer the image, add a little water to the mirror surface.

Then, soak the waterslide paper in water for 15 seconds it will curl up like the image below.

As the backing paper becomes wet, it will release the image. Carefully position the image on the mirror, then gently slide it into place. The water on the mirror allows you to adjust the image until you’re satisfied with its position. Once it’s perfectly placed, use a soft cloth to smooth out the image, removing any excess water and air bubbles underneath.

Allow the image to dry fully before moving on to the next step.

Step 6: Add Halloween Elements
To add extra character, I painted the outside of the mirror with more gesso to give it a more weathered look. Then, I glued black plastic spiders and skeleton hands to the frame. I used a heat gun to bend the hands into shape for a more realistic effect. A hot glue gun made it easy to secure everything in place, and I made sure the decorations could be removed after Halloween.

Step 7: Display the Mirror
Your Halloween mirror is now complete! The great thing about this project is that you can change the image each year, giving the mirror a fresh look every Halloween. I hung mine by the doorbell for the trick-or-treaters, ready to surprise everyone with its eerie reflection.
In the daylight, the mirror looks a bit plain.

But at night, the mirror takes on a whole new creepy vibe. I placed it in the corner of the room, surrounded by flickering candles and the Halloween mixed media art bottle I created a few years ago. The soft glow of the candles enhances the eerie reflection of the sugar skull, adding to the spooky atmosphere. It’s the perfect finishing touch to create a haunting Halloween display!


Tutorial for the Halloween Bottles

More Halloween projects
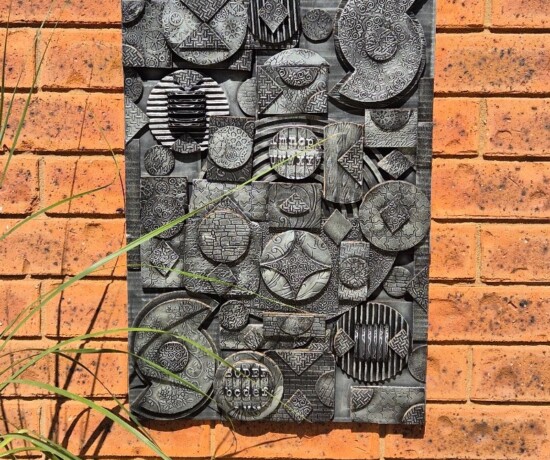
This Halloween wall sconce is a great way to let everyone know you’re joining in the Halloween fun and that sweets are waiting for them at your house!
This skull goblet would look great as a centrepiece for a Halloween party, made from an oversized wine glass.


If you’d like to find any of the items used in this project, we’d greatly appreciate it if you used our affiliate links. These links provide us with a small commission at no extra cost to you, allowing us to continue creating and sharing more inspiring projects. We’d also love to hear your thoughts—feel free to leave a comment or share this post!

22 Comments
Sylvia|Grace for a Gypsy
July 12, 2019 at 3:53 amOh my gosh, I am sharing this with my daughter. She loves Halloween and also skulls!
Anita Holland
July 12, 2019 at 8:12 amThank you so much, thought I would start early with Halloween this year.
Michelle
September 15, 2019 at 7:02 pmVery clever and awesome!
Anita Holland
September 16, 2019 at 11:49 pmThank you so much
Michelle
September 16, 2019 at 1:06 amI love the hands and the spiders so much!
Anita Holland
September 16, 2019 at 11:51 pmThank you, a cheap and easy way to decorate.
Our Hopeful Home
September 16, 2019 at 10:29 pmWhat a cool, spooky mirror! Great tutorial. Thanks for sharing at Vintage Charm. xo Kathleen
Anita Holland
September 16, 2019 at 11:52 pmThank you so much, I nice quick project.
Kathy A
September 17, 2019 at 6:55 pmGreat project; gives me more things to look for when thrifting/yard saling. Will be on the lookout for bugs/skelly hands after Halloween!
Anita Holland
September 18, 2019 at 1:41 amThank you so much
Michelle Leslie
September 19, 2019 at 5:41 amShe’s gorgeously creepy and such a fun idea Anita. And I totally get you with trying to take some photos of a mirror. Not easy at all but the one you’ve got with those beautiful steampunkish candles you made in front, is perfect. Pinned
Carol
September 19, 2019 at 7:35 pmOMG this is so creative and beautiful. Just love it. Featuring when my link party opens up tonight!
Anita Holland
September 22, 2019 at 10:13 amThank you so much😀😀
Lisa L Lombardo
September 22, 2019 at 6:49 pmI love it! Thanks for sharing on Farm Fresh Tuesdays!
Anita Holland
September 23, 2019 at 2:23 amThank you so much.
Julie
September 28, 2019 at 3:01 pmMirrors are always so hard to photograph, you did a great job!
What a clever technique to transfer the image.
Anita Holland
September 29, 2019 at 9:26 amThank you so much, they are a nightmare.
SRoome
October 2, 2019 at 11:07 pmExcept that the artist is using Day of The Dead imagery here, and not Hallowe’en. It is considered by many to be Cultural Appropriation. There are other images that can be used that do not appropriate others cultures, beliefs, traditions.
Anita Holland
October 4, 2019 at 5:25 amI think we just go with the flow without realising sometimes what things mean to different cultures. You cant walk into a shop at the moment without seeing sugar skulls splashed over merchandise. My project was not made to offend.
Witch Themed Halloween Ideas for Halloween Decor, Recipes and Fun Halloween Crafts
September 27, 2020 at 1:20 pm[…] Halloween Mirror by Unique Creations by Anita […]
20 Halloween DIY Decor Ideas for Inside and Out!
September 21, 2022 at 12:41 am[…] Halloween Mirror by Unique Creations by Anita […]
27 EASY HALLOWEEN OUTDOOR DECOR - Decor | Dine | Diy
September 6, 2024 at 12:32 am[…] 23. Halloween Mirror […]