
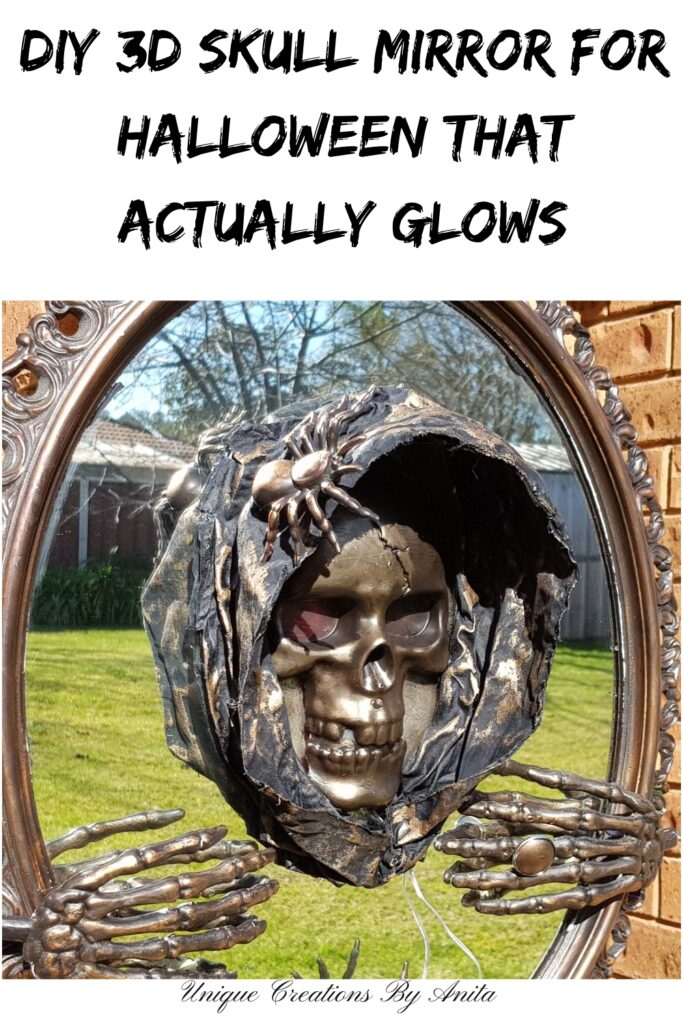
If you’re looking for a spine-chilling Halloween DIY, this 3D Halloween Skull Mirror will leave your guests spooked. After the success of my original Halloween mirror using waterslide paper, I wanted to take it a step further this year. One follower commented that the skull would look better if it appeared to be coming out of the mirror—and I couldn’t agree more! So, I took that advice and turned my flat skull illusion into a glowing, dimensional horror piece you can proudly hang on your porch this Halloween.

Before we dive into this tutorial, be sure to subscribe to my bimonthly newsletter to be the first to see my latest projects. You can also follow me on Pinterest and Facebook, where I also include my unique mixed-media art projects.
How to Make a Creepy 3D Halloween Skull Mirror That Lights Up
**This post may contain affiliate links. This means I earn a small commission on links used at no extra cost to you. Please see my disclosure policy for more information.**
Materials Needed
- Old mirror (preferably vintage or thrifted)
- Gesso or black paint
- Bronze metallic wax paste
- Skull-shaped jelly mould
- Epoxy resin (with 2:1 mixing ratio or per your resin instructions)
- Glow-in-the-dark powder (optional)
- Red resin pigment (optional)
- Battery-operated LED string lights
- Plastic wrap (for protection)
- Fabric (scrap piece, dark colours work best)
- Fabric stiffener or craft glue
- Small bowl for mixing
- Skeleton hands or other Halloween embellishments
- Hot glue gun and sticks
- Sanding block
- Paintbrush or sponge applicator
Step 1: Prepare the Mirror
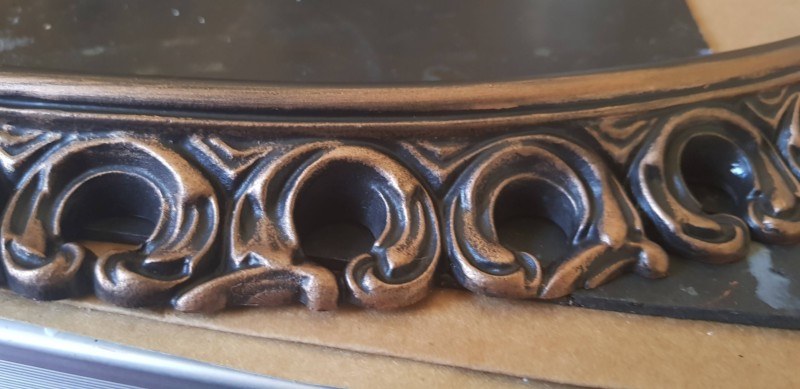
Start by painting your mirror frame black using Gesso or chalk paint. Once dry, rub bronze wax paste gently over the raised edges using your fingertip to highlight the frame and add an aged, haunted effect.

Reusing last year’s mirror saved time and gave it a nostalgic twist.
Step 2: Make a Glowing Resin Skull
Pour resin into a skull jelly mould. Before pouring, arrange LED lights inside the mould. Leave enough cord length to hide the battery pack behind the mirror later. Add red pigment and glow-in-the-dark powder to the resin for extra effect.

Mix your resin thoroughly for at least 5 minutes. This ensures it cures properly. Pour into the mould, then remove surface bubbles with a blow torch or heat gun. Let it set for 12 hours or as directed.

Once cured, demould and sand the edges. Paint the skull black for a bolder daytime look if desired.

Step 3: Shape the 3D Hood
Mix fabric stiffener (or diluted craft glue) in a small bowl. Soak your fabric thoroughly.

Cover the mirror and skull with plastic wrap to protect the surfaces.
")
Drape the wet fabric over the skull, shaping it as it dries.

Adjust and refine the shape over time, using whatever you have on hand to hold the folds in place until it hardens completely.

Step 4: Assemble the Mirror
Once dry, hot glue the hood and skull onto the mirror. Touch up the hood and skull with bronze wax paste to blend the look and add depth.

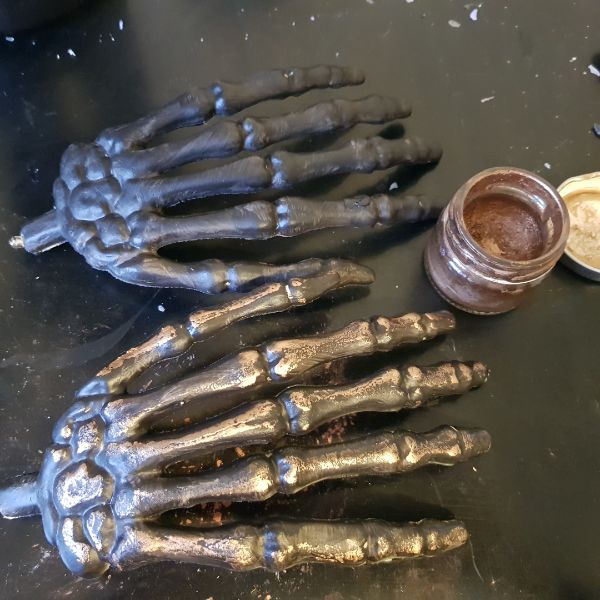
Glue on skeleton hands, painted black and lightly waxed, to enhance the creepy vibe.
Step 5: Hide the Battery Pack
If you misjudged your wire length like I did, hide the battery box with a scrap of black fabric. Add a fake spider or Halloween embellishment to disguise it.

This quick fix added to the eerie effect! The moment I turned the lights on, I noticed the glow-in-the-dark powder, red pigment, black paint, and bronze wax all affected the final light colour. If you want the eyes to shine red, it’s a good idea to leave them unpainted.

Close-up of the skull and hood.

It looks so much better outside because you can see all the details in the mirror.

More Halloween projects for you
This flashing Halloween lightbox can be put on your porch to attract the trick-or-treaters.

These cute Halloween skull men were made using shot glasses.


If you’d like to find any of the items used in this project, we’d greatly appreciate it if you used our affiliate links. These links provide us with a small commission at no extra cost to you, allowing us to continue creating and sharing more inspiring projects. We’d also love to hear your thoughts—feel free to leave a comment or share this post!

60 Comments
anna
September 27, 2020 at 7:44 pmAmazing !
Anna
Anita Holland
September 28, 2020 at 12:11 pmThank you so much Anna.
Marie-Interior Frugalista
September 28, 2020 at 12:42 amThis is really cool, Anita! The hood adds so much more to the creep factor and love how it lights up. Great camouflage idea for the battery pack too. Pinned
Anita Holland
September 28, 2020 at 12:13 pmThank you, Marie, Is it weird that I love doing Halloween projects? lol I could have kicked myself about not leaving enough wire, but all good in the end.
Michelle Leslie
September 28, 2020 at 9:05 pmNooooooooooooooooooo, Anita this brilliant!!! Oh my goodness she’s so frightenly awesome (I’m assuming she’s a she?) and the way you disguised the battery pack too. Love everything about it. You’re always so creative and unique with your projects.
Ellen Best
September 28, 2020 at 9:20 pmWow that is creepy, whenever I visit I wish the craft gene had not passed me by. But it did and though I know from forty years of attempting It isn’t for me. But if you were near I would join a workshop just to be near someone who certainly can. Good job. I popped over from the linkitz party #SenISal .
Anita Holland
October 2, 2020 at 7:47 pmAww, thank you that is such a lovely comment.XX
Maria
September 29, 2020 at 6:09 amCreative and creepy ! You did such a amazing job.
Anita Holland
October 2, 2020 at 7:48 pmThank you so much Maria, I can’t do cute no matter how hard I try. lol
sara
September 29, 2020 at 6:13 amWow, that is so awesome Anita! Nobody does Halloween as good as you!
Anita Holland
October 2, 2020 at 7:49 pmThank you Sara, it is one of my favourite Holidays for crafting. I just love making the projects, I can go all out without offending anyone lol
Kim Purvis
September 29, 2020 at 9:38 amLove this idea! It is rught up my Haloween alley! Great job! Pinned.
Anita Holland
October 2, 2020 at 7:54 pmThan k you so much Kim, I love the skulls for Halloween.
Janet
September 29, 2020 at 9:06 pmWow…such a creative and spooky project!!
Anita Holland
October 2, 2020 at 7:55 pmThank you Janet.
Michele Morin
September 29, 2020 at 9:28 pmLoved reading about your problem solving process. It’s reassuring to know the project can still turn out great even if you have to accommodate oversights.
Anita Holland
October 2, 2020 at 7:56 pmThan k you Michelle. Because I make all my projects up as I go along, they do go wrong often. I just change the plan and come up with a new one.
Brooke
September 29, 2020 at 10:49 pmSo amazing! Wish we were having our kids Halloween party this year. We turn the garden into a haunted garden and have tons of strobe lights and fog. This mirror will be pinned, with hopes we can have our party next year.
Anita Holland
October 2, 2020 at 7:57 pmSounds like you had a great time at your house for Halloween.
Linda Johnston
September 29, 2020 at 11:25 pmSpooky!
Anita Holland
October 2, 2020 at 7:57 pmThank you Linda
Lori Nell
September 30, 2020 at 1:39 amAnita, These are great Halloween decor ideas. I love the mirror with the skeleton! The tutorial is amazing!!
Anita Holland
October 2, 2020 at 7:58 pmThank you so much Lori, I get these ideas in my head I just need to figure out how to make them. I am learning with each project I do.
Sherry Denise Cole
September 30, 2020 at 9:34 amThe project turned out great! I would love to have the mirror with the skeleton to use on my porch.
Anita Holland
October 2, 2020 at 8:03 pmThank you so much, you can now make one lol
Marielle
October 1, 2020 at 6:30 amWow! That is an amazing looking Halloween decoration! I would have had NO idea how to make it either. Thanks for sharing the tutorial! I’m visiting today from Your Whims Wednesday link up. Have a great day Anita!
Debbie-Dabble
October 1, 2020 at 9:53 pmAnita!!
This is just fabulous!! Love it!! What a fantastic idea! Thanks so much for stopping by!! You mentioned the frame with the couch in your comment..No, I did not make it..Joe bought it at J.C. Penney’s about 10 years ago….
Take Care!
Hugs,
Deb
Dee | Grammy's Grid
October 2, 2020 at 3:10 amThat looks really scary, great job! Thanks so much for linking up with me at my #UnlimitedMonthlyLinkParty 17. Shared.
Leanna
October 2, 2020 at 11:33 amSuch a spooky and well done project. I always enjoy how novel and unique everything you create is. This mirror is wild fun for Halloween.
Anita Holland
October 2, 2020 at 8:08 pmThank you so much Leanna, for the awesome compliment.
Naush Samama
October 4, 2020 at 6:05 pmAnita, your creativity never cease to amaze ! The hood on the skull add a real spooky touch. Very creative and clever.
Thank you for joining at Meraki Link Party.
Love
Naush
Anita Holland
October 6, 2020 at 1:08 pmThank you so much Naush, that is very nice of you to say. I was never the brightest star in the sky so I think I was given a creative mind to make up for it. lol
Linda Primmer
October 5, 2020 at 3:30 amAnita, this is amazing! Can you share this again next week at Love Your Creativity link party. I want to feature it since it is getting closer to Halloween.
I cannot believe the amount of work. it looks awesome and so creepy!
Anita Holland
October 6, 2020 at 1:10 pmThank you so much Linda, I would love to share it on your site. It does seem like a lot of work it was just time-consuming waiting for the resin and stiffener to dry.
Ann
October 5, 2020 at 5:18 amYour mirror came out great, Anita and I actually like the blue lights! Thank you for sharing at Party In Your PJ’s.
Anita Holland
October 6, 2020 at 1:11 pmThank you Ann, the blue does give a good effect at night.
Cecilia
October 5, 2020 at 6:43 amHow fun! Thanks for sharing at Vintage Charm!
Anita Holland
October 6, 2020 at 1:12 pmThank you Cecilia, I will be back next week lol
Free come and join #132 Senior Salon
October 5, 2020 at 8:30 pm[…] How to make a 3D Halloween mirror […]
Anita Holland
October 6, 2020 at 1:13 pmThank you Esme.
Carol
October 5, 2020 at 11:02 pmYou are definitely the queen of creativity. Wow such fun. #MMBC
Anita Holland
October 6, 2020 at 1:15 pmThank you so much for the awesome comment.
Terri Gardner
October 6, 2020 at 4:14 amOh, my gosh-that’s crazy cool!
Anita Holland
October 6, 2020 at 1:18 pmThank you Terri, it was the crazy fun making it.
Anita Holland
October 6, 2020 at 1:17 pmThank you, Marilyn, for stopping by.
Anita Holland
October 6, 2020 at 8:19 pmThan k you so much Michelle, and thanks you so much for the feature I really do appreciate it.
Debbie-Dabble
October 8, 2020 at 10:52 amThanks again for stopping by!! Stay safe m healthy and happy!!
Hugs,
Debbie
Anita Holland
October 14, 2020 at 1:34 pmThank you so much Debbie.
Liz
October 9, 2020 at 12:15 amGreat!
Anita Holland
October 14, 2020 at 1:35 pmThank you so much.
Cat
October 9, 2020 at 10:18 pmOooooh, that is so neat!!
Anita Holland
October 14, 2020 at 1:35 pmThank you Cat.
Anita Holland
October 14, 2020 at 1:35 pmThank you so much for the feature on my mirror.
Dee | Grammy's Grid
October 31, 2020 at 7:19 pmCONGRATS! Your post is FEATURED at my #UnlimitedMonthlyLinkParty 18.
Anita Holland
November 1, 2020 at 4:21 pmThank you so much for the feature it is greatly appreciated.
Debra Jerry
November 8, 2020 at 10:38 pmLove this, Anita!
Anita Holland
November 9, 2020 at 9:53 amThank you so much.
Olga
September 28, 2021 at 11:49 pmThis is amazing. and you made it so simply. A must try for our creepy house. Thank you
Anita Holland
October 2, 2021 at 3:53 pmThank you Olga, it really was quick and easy.
The Best Cheap & Easy Halloween Decor Ideas | Sunny Side Design
September 8, 2022 at 11:31 pm[…] Image credit: uniquecreationsbyanita.com […]