
Wooden barn quilts are everywhere right now, and for good reason—bold geometry, cosy timber, instant impact. In this tutorial, DIY Wooden Barn Quilt Wall Art from Scrap Plywood, I’ll show you how I turned leftover plywood strips into a striking geometric wall art.
I jumped into barn quilts feet-first—my very first project was a full king-size headboard (classic me). I used the leftover pieces from that project to create this simpler design and walk you through an easy, repeatable method. It might look intricate, but it’s very straightforward, as you’ll see in this step-by-step tutorial.

Before we dive into this tutorial, be sure to subscribe to my bimonthly newsletter to be the first to see my latest projects. You can also follow me on Pinterest and Facebook, where I also include my unique mixed-media art projects
DIY Wooden Barn Quilt Wall Art from Scrap Plywood
**This post may contain affiliate links. This means I earn a small commission on links used at no extra cost to you. Please see my disclosure policy for more information.**
Materials & tools
- 12 mm plywood sheet for the square base
- Plywood offcuts/strips for the pattern (consistent thickness)
- Measuring tape, carpenter’s square, ruler/straightedge, pencil
- Table saw (ripping strips) and push stick
- Mitre saw set to 45° (cutting triangles/chevrons)
- Orbital sander with 220-grit discs
- Wood stain(s) or paint, and rags/brushes
- Painter’s tape
- Hot glue gun with quality glue sticks or wood glue + pin/brad nailer
- Circular saw (to trim edges flush)
- Iron-on wood veneer edge banding (optional, for clean sides)
- Stanley knife/utility knife (to trim veneer)
- Satin clear sealer (spray polyurethane or clear acrylic)
- D-rings and picture wire or a French cleat (for hanging)
- Safety gear: eye protection, hearing protection, dust mask/respirator, clamps
Creating a basic barn quilt design
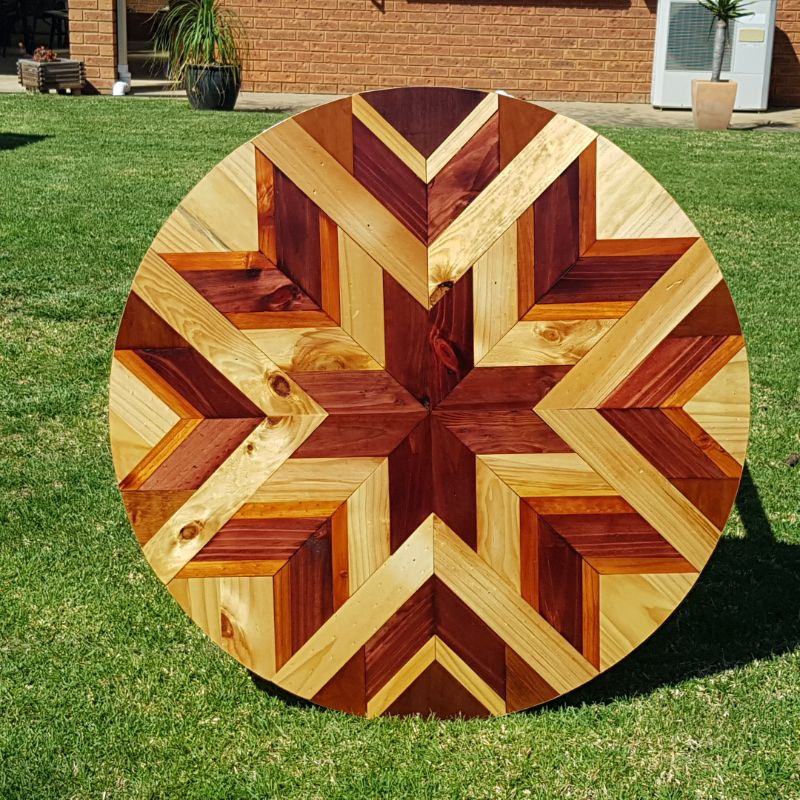
A barn quilt is a timber mosaic made from strips of wood cut at 45° to form simple shapes that slot neatly together. You can vary the strip widths and lengths, but keep the thickness the same so the surface stays even. Most patterns begin with a star at the centre. You repeat the same 45° units around that star, growing the design outward. Only when you reach the outer edge of the square do you add different pieces—small squares, triangles or diamonds—to complete the border.

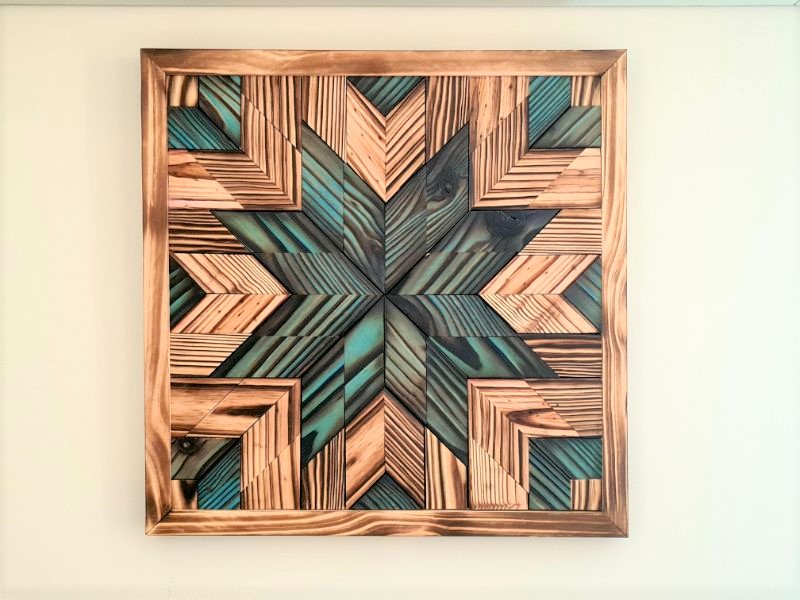
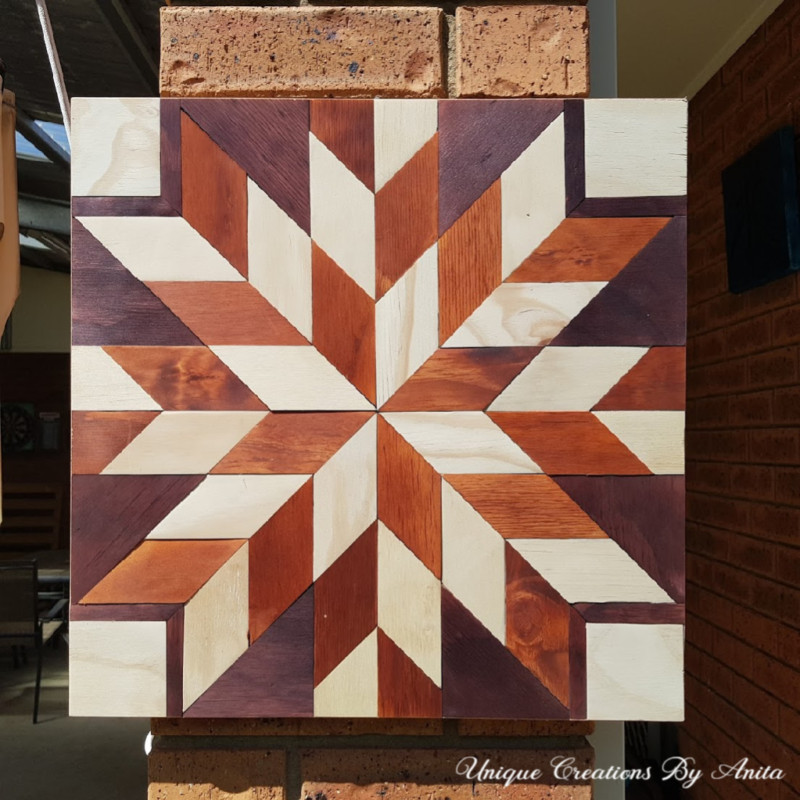
Across the designs shown above, the geometry is the same shape repeated in different sizes. In the first design, every single piece is identical; the pattern appears because of how the pieces are oriented and how the wood is stained or painted. In other words, colour placement and rotation create the “quilt” effect, not a pile of complicated cuts.
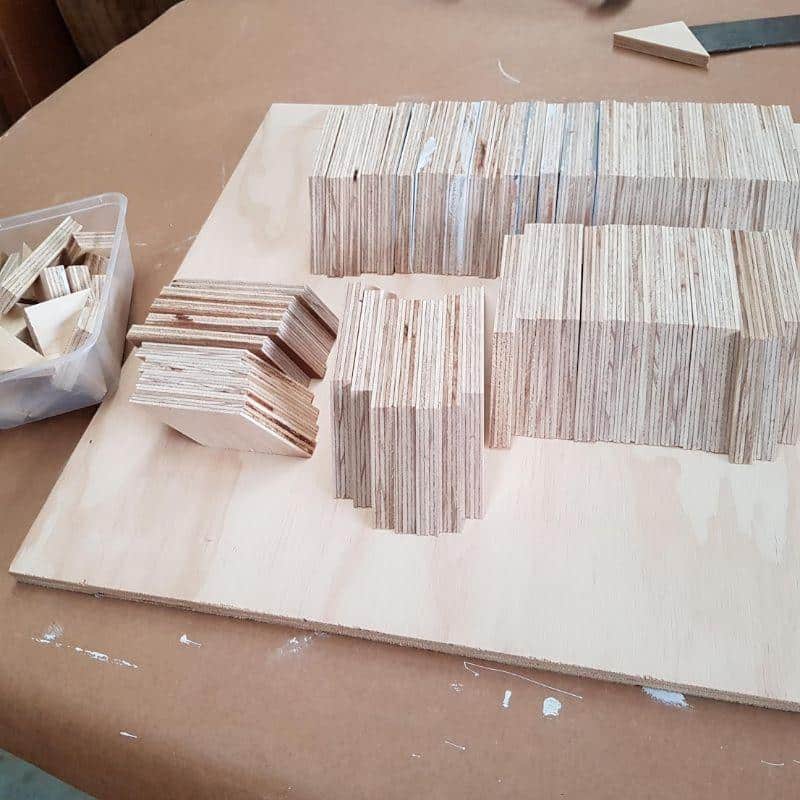
Wood needed
This project is perfect if you’ve got lots of scrap wood lying around. It doesn’t matter if some sheets are a little bowed—once you cut them into small pieces, it’s not noticeable. Keep the thickness consistent for a neat finish; for this build, I used 12 mm plywood. Sand both faces before you start cutting, rather than sanding dozens of small pieces later. I used an orbital sander with 220-grit paper.

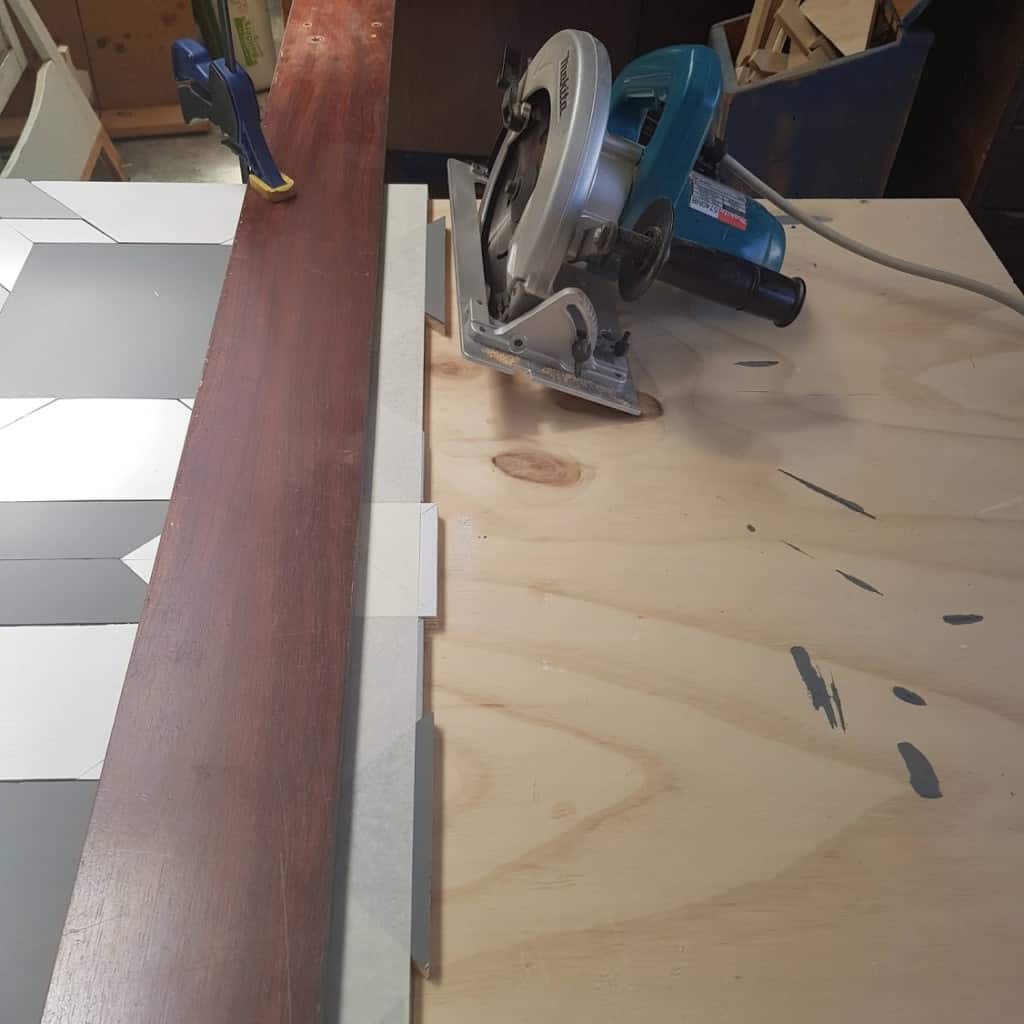
Rip your strips
Set the table saw fence to 50 mm. Rip enough strips in one go so every piece matches in width. Consistency now gives crisp lines later.

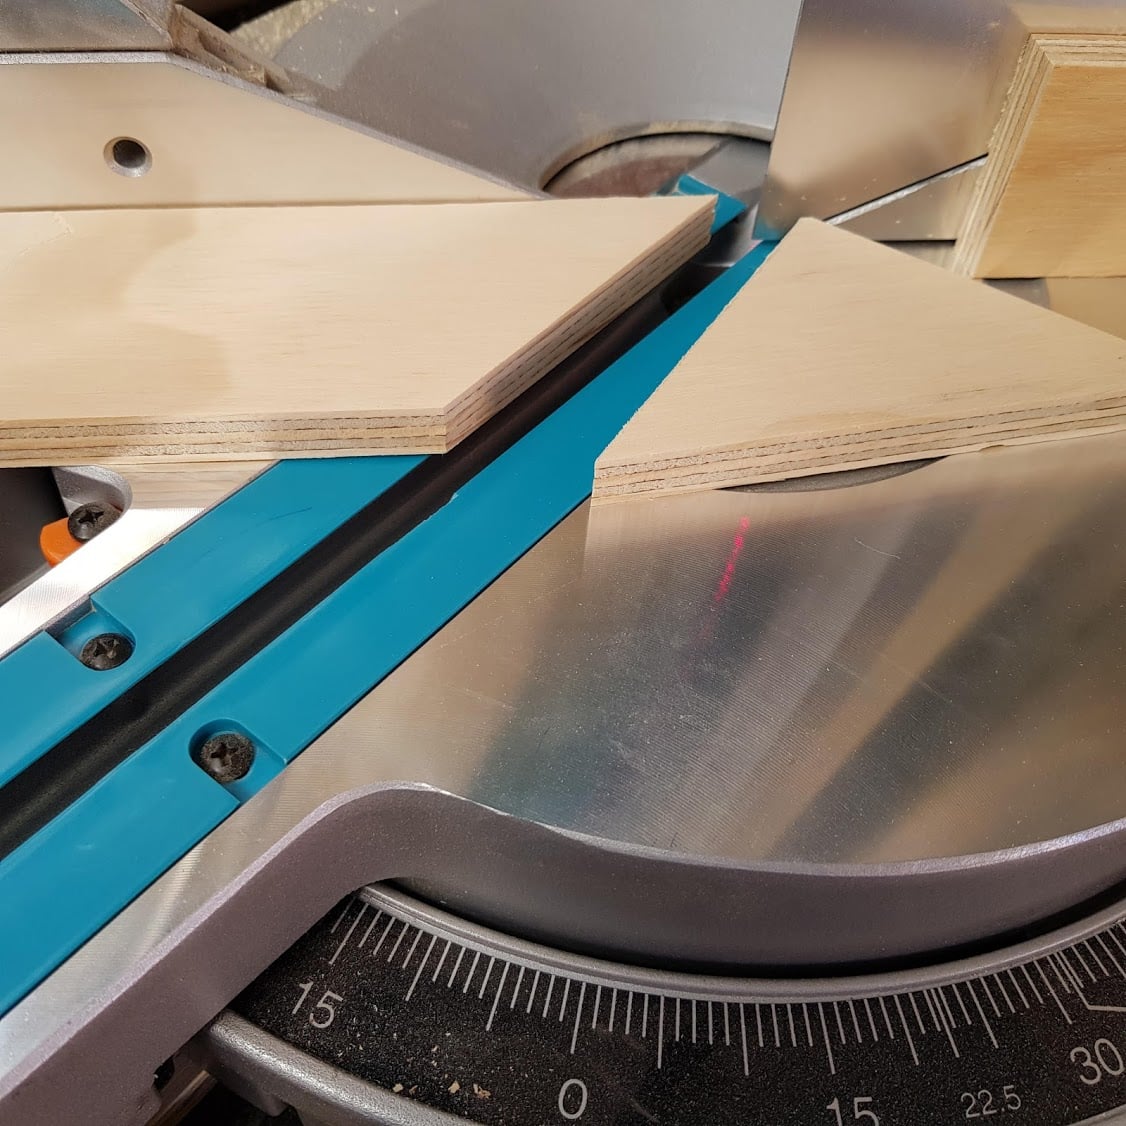
Cut the angles
Set your mitre saw to 45°. Cut shapes from the strips. You can vary lengths, but keep the angle consistent. Use a stop block so repeated cuts match.

You can vary lengths, but keep the angle consistent. Working out how many pieces to cut per project is hard to judge. I work mine out by cutting about one-and-a-half times the amount of wood as the base. You can always use the scraps in your next project or create scrap-wood wall art similar to this.

Prep the square base
Cut a square backer to the size you want. Draw a centred grid: diagonals corner-to-corner, then light guidelines at 90°. These lines anchor the pattern and keep it straight. I use recycled wood for all my projects; once it’s prepped and covered, you won’t see the old damage. A decent-sized barn quilt is typically 60–90 cm.

Dry-lay the design
Start in the centre. Place two 45° pieces to form an arrow/chevron. Mirror it to build a star.

Keep laying pieces like a jigsaw, working outwards. Mix in triangles and diamonds if you like. Let pieces overhang the edge. We’ll trim later. Do not glue yet.

Stain for contrast
Lift pieces and apply stain as you go. Staining the wood before glueing it down makes life easy. Plywood absorbs stain unevenly, especially from mixed batches. Embrace the variation, or use a pre-stain conditioner for a more even tone. Shuffle pieces until you like the flow. Here’s why sanding both sides comes in handy: if you don’t like the colours, flip the piece and use the other side. Just note it may not slot back into the exact spot, so keep a few extra pieces on hand.

Glue it down
I tested a few methods. Hot glue won for speed and grip on plywood. Use quality sticks; cheap sticks can pop. Press each piece firmly for a few seconds.

Nail guns work too, but nails can show and need filling. Start in the middle and work outwards.

Filling in the gaps
A triangle-shaped piece, a small square, or an offcut of the existing shape should fill any gaps.
Cutting away the overhand
I didn’t photograph this step, so I’ll show the process using the headboard barn quilt. When the pattern is complete, run painter’s tape along the cut lines to reduce splintering. Clamp a straight scrap as a fence, then run a circular saw around all four sides to square the panel. The result looks clean and professional and makes framing easier.
Finish the edges
Skip the frame for a clean, modern look. Cover edges with iron-on veneer tape. Use an old iron on dry heat. A cotton rag between the iron and veneer protects the face

. Press, cool, then trim flush with a sharp utility knife. Sand lightly.

Seal and hang
Spray two light coats of satin polyurethane, sanding lightly between coats if needed. Fit D-rings and wire, or use a French cleat for heavier pieces. Hang out of direct sun to reduce fading.

More Barn quilt ideas
Once you start, barn quilts are addictive. I’ve kept experimenting with new patterns and finishes—here are some of the other pieces I’ve made.
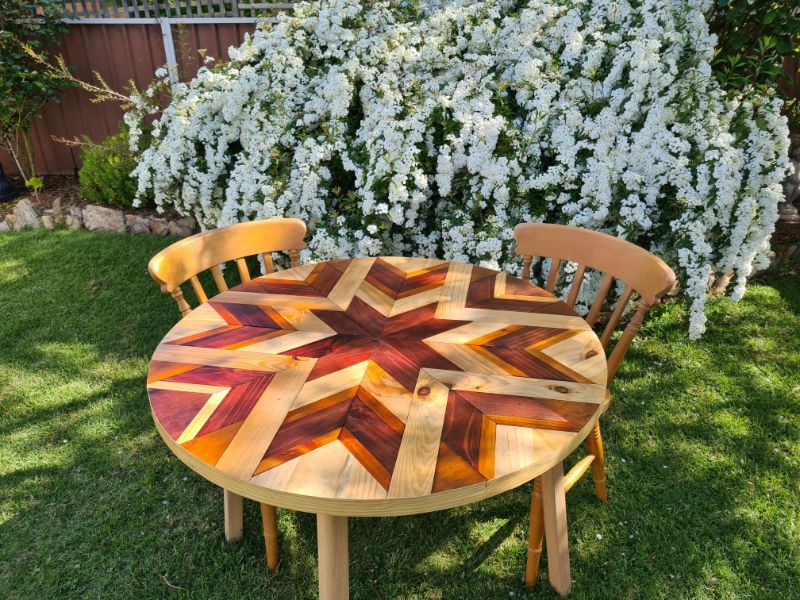
I repurposed an outdoor table and gave it a barn quilt makeover.
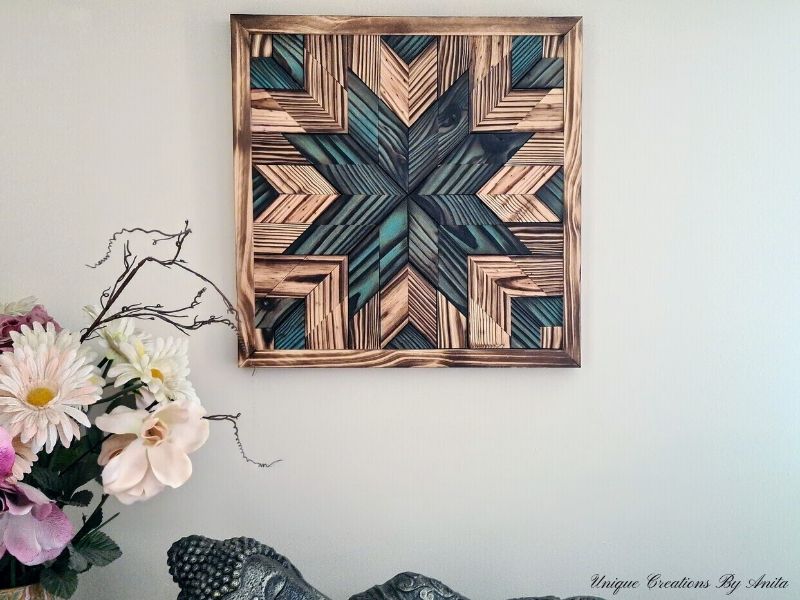
You can also play around with the texture to create a different effect, like I did with this Shou sugi ban finish

If you’re interested in any of the items used in this project, we’d appreciate it if you used our affiliate links. Clicking these links earns us a small commission at no extra cost to you, helping us create more inspiring and exciting projects to share. We’d also love to hear your thoughts—feel free to leave a comment or share this post!

33 Comments
Michele Morin
April 7, 2020 at 9:42 pmWhat patience and precision this project required! So beautiful!
Anita Holland
April 8, 2020 at 9:59 amThank you so much, it really does look harder than it actually is.
Anita Holland
April 13, 2020 at 10:47 amThank you so much, It is honestly not that difficult you should give it a try.
Michelle
April 9, 2020 at 11:38 amThis is beautiful! You did an amazing job on this! I love barn quilts. It’s so nice seeing them pop up all over town where I live recently.
Anita Holland
April 13, 2020 at 10:49 amThank you so much, I had never seen them until about 6 months ago. Now I love them.
Kristen Hubert
April 9, 2020 at 10:22 pmI love this especially all the different shades of the wood.
Michelle Leslie
April 12, 2020 at 11:54 pmIt looks stunning Anita. Every time I see one of your projects I always wish we’de met in our home country. Damn girl, we would have had so much fun together. Your stuff is always so inspiring and unique. Thank goodness for people like you who jump in feet first 😀
Anita Holland
April 13, 2020 at 10:44 amAWWW, Thank you so much Michelle for the beautiful comment, I feel the same when I see your work. I am sure we would come up with some really crazy ideas if we did get together.
Cecilia
April 13, 2020 at 1:49 amBack in the 90s, I bought a kit like this featuring a raw quilted house design that I painted, and I hung onto it for years. I’m very impressed that you cut your own! Thanks for sharing at Vintage Charm!
Anita Holland
April 13, 2020 at 10:42 amThank you so much Cecilia, I would love to see it if you still have it.
Grandma's House DIY
April 14, 2020 at 12:45 amThanks so much for sharing with us! I’ll be featuring you this week on my blog, Instragam and Facebook!
To Grandma’s house we go link party at https://www.grandmashousediy.com
Anita Holland
April 15, 2020 at 10:23 amThank you so much for the feature on my Barn quilt.
Sarah @ The DIY Mommy
April 14, 2020 at 7:24 amWhat a great project! It looks fantastic!
Anita Holland
April 15, 2020 at 10:23 amThank you so much. Sarah.
Deshai
May 16, 2020 at 4:39 amI absolutely love this project. Came across it when researching to do my own. If you dont mind sharing, what are the measurements of each little shape? It looks like a 2 in X 2 in. Thank you so much!
Anita Holland
April 15, 2020 at 10:22 amThank you so much for the shout out on my Barn Quilt. It is greatly appreciated.
Sam _ Raggedy Bits
April 16, 2020 at 10:24 amThis turned out so beautiful Anita!! A perfect and different way to display all the beautiful Barn quilt patterns!
Michelle @ The Painted Hinge
April 17, 2020 at 3:03 amThis is gorgeous Anita! Thank you so much for sharing this at Farmhouse Friday – I’m featuring it at tomorrow’s party!
Anita Holland
April 19, 2020 at 11:57 amThank you so much Michelle for the lovely comment and the feature. See you next week. X
Leanna Forsythe
April 18, 2020 at 10:40 amThis is beautiful, it takes lots of patience and skill to do these cuts. Beautiful job,
Anita Holland
April 19, 2020 at 11:59 amThank you so much for the feature on my wooden barn quilt. It is greatly appreciated.
Linda at Mixed Kreations
November 11, 2020 at 10:30 pmYour barn wood quilt is lovely! And WOW on your headboard, it’s amazing! I don’t think that I would have enough patience to make one with all the cuts. Beautiful work!
Anita Holland
November 13, 2020 at 7:05 pmThank you so much, Linda, I find it so relaxing until the last few because they never fit properly. lol
Anita Holland
December 31, 2020 at 10:57 amIt is very beautiful and so much work, well done.
27 EASY Scrap Plywood Project Ideas - Anika's DIY Life
February 5, 2022 at 4:30 am[…] Wooden Barn Quilt from Unique Creations by […]
Sharon
February 8, 2022 at 2:32 amI love this! My quilting group has decided to make barn quilts to display in our yards and designate us as members. Additionally, Hubs is a marvelous woodworker, and I work with a scroll saw, so we always have tons of scrap materials. Have you ever tried staining the pieces of wood, and then cutting into desired shapes?
Anita Holland
February 8, 2022 at 6:33 amThank you. I did try staining first, but found my saw at times chipped the surface and I had to go back and add for stain. I also prefer to add stain down the sides because it make the design blend better together. The white down the sides stands out more. I just found it easier.
14 Gorgeous Barn Quilt Patterns For You To Try - Cotton & Cloud
April 26, 2022 at 7:23 pm[…] 2. Stained Barn Quilt […]
Marti Bowland
August 20, 2022 at 10:54 pmCutting precision using a mix of plywoods like you achieved is hard to do. Your barn quilt is beautiful. Let me ask you: could I do this using a variety of remnant luxury vinyl flooring if they are all the same thickness?
Tim Ahlfeld
October 12, 2023 at 7:59 amThis is a nice project. Love the color design. Looks 3D
I have a question regarding the dimensions. It would be easiest if you told us how large the square is. Once we have that information, we can cut the wood to the desired lengths.
Thank you.
Anita Holland
October 14, 2023 at 7:43 amThanks for your comment Tim. Mine was 45cm square, but it really does not matter what size it is because all the pieces are the same and will just fit in until the final pieces.
Sarah Harrisberger
June 8, 2025 at 3:48 pmBeautiful design! Did you prime before and / or seal after?
Anita Holland
June 17, 2025 at 12:36 pmThanks Sarah, I use a liquid stain only so I did not prime. I did seal with polyurethane after it dried.