
I’m always on the lookout for fresh, exciting projects to keep my website engaging, and this time I decided to dive into the world of mixed media art. After discovering some stunning mixed-media canvases on Pinterest, I was immediately inspired. I watched a few tutorials on YouTube and decided to give it a go, with my daughter’s recent wedding as the perfect theme. The idea was to incorporate elements from her special day into the canvas, creating a unique and personal keepsake.
This was my very first attempt at creating a mixed-media canvas, and I wasn’t sure how it would turn out. I documented the process just in case it worked out, and I’m so happy with the result! I decided to share my journey with you, hoping it inspires others to try their hand at mixed media art.

Before we dive into this tutorial, be sure to subscribe to my bimonthly newsletter to be the first to see my latest projects. You can also follow me on Pinterest and Facebook, where I also include my unique mixed-media art projects.
Mixed Media Wedding Canvas: A Meaningful Craft Project
**This post may contain affiliate links. This means I earn a small commission on links used at no extra cost to you. Please see my disclosure policy for more information.**
Materials Needed:
- Canvas (size of your choice)
- Black gesso primer
- Stencils (Cricut or purchased)
- Texture paste
- Hot glue gun
- Embellishments (artificial flowers, steampunk charms, old jewellery)
- Sisal string
- Corrugated cardboard
- Gold wax paste
- shimmer spray
- Metal tiles
- Wedding photo
Step 1: Prime the Canvas
Start by sealing your canvas with black gesso primer. I chose black because it makes hiding any white spots easier, especially once the embellishments are added. Apply a thin layer and let it dry. If you’re in a rush, you can speed up the drying process using a heat gun or hairdryer.

Step 2: Add Texture
Use a stencil and texture paste to create depth on your canvas. Whether you’re using a Cricut or store-bought stencils, apply the texture paste with a spatula. Once you’ve added the paste, remove the stencil immediately and wash it off. Don’t worry about making everything perfect—imperfections can add character and charm. To learn the basic techniques for assemblage mixed media, this post will walk you through 15 ways to add texture.

Step 3: Gather Embellishments
For embellishments, look around your home or workshop. I used artificial flowers, steampunk charms from a previous project, and old jewellery pieces I no longer wear. Thrift stores are also great places to find unique additions for your project.

Step 4: Add Layers of Embellishments
Wrap thin sisal string around the canvas and glue it in place. Since my daughter’s wedding reception was on a showboat in Sydney Harbour, I used hot glue to create water-like runs to represent the theme. To make the centre of the canvas pop, I layered cardstock cutouts and glued them together, creating added height for a more dramatic effect.

Step 5: Paint Your Embellishments
Once your embellishments are in place, paint them with black gesso to match the rest of the canvas. If you want some pieces to sparkle, spray them with shimmer spray before glueing them down. Remember, don’t glue everything down immediately. Play around with the placement and take a photo to guide the final glueing process. Once you become more confident, you can add the directly to the canvas.

Step 6: Add Wax Paste and Shimmer Sprays
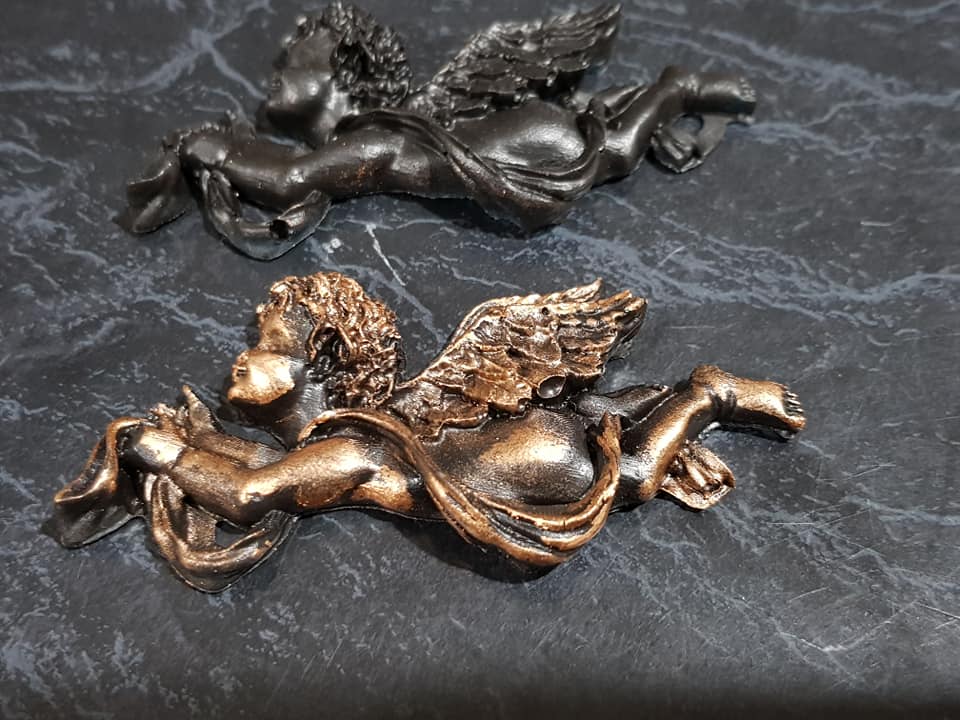
After your canvas is complete, it’s time to add an aged effect. Rub gold wax paste over your charms with your fingers. For an extra shimmer, use a shimmer spray over certain areas to make your embellishments sparkle. If you’re not happy with the results, don’t worry! Just paint over it with black gesso and start again. If you’d rather not spend a lot on shimmer sprays and wax pastes, you might already have the ingredients at home to make them yourself. You can learn how to do it here.

This the the effect of the wax paste on the resin embellishments.
Step 7: Personalise the Canvas
To make the canvas more meaningful, I added personal touches from my daughter’s wedding day. For example, I attached photo charms from her wedding bouquet, representing a memorial for her late Nana.

The clock shows the time of her wedding, and the key symbolises the key to her heart. I also added elements like the “something blue” charm and a small joke with the handcuffs.

Everything added to the wedding canvas had some meaning to them as a couple to make it more special.


More wedding project ideas
These unique bridesmaid invitations are made using Scrabble tiles, creating a memorable keepsake that your bridesmaids will cherish.

I created these personalised rhinestone wedding sneakers for my daughter, ensuring she would have comfortable feet while still looking fabulous on her special day.


If you’d like to find any of the items used in this project, we’d greatly appreciate it if you used our affiliate links. These links provide us with a small commission at no extra cost to you, allowing us to continue creating and sharing more inspiring projects. We’d also love to hear your thoughts—feel free to leave a comment or share this post!

15 Comments
Veronica Salfi
September 12, 2019 at 12:29 pmGorgeous and unusual. After painting everything black, what did you use for the pink, gold and purple items? Paint, wax… I love the look.
Anita Holland
September 12, 2019 at 9:38 pmThank you, I made my own wax pastes using furniture wax and mica powder. There is a link in the post that will show you how I made them all very straight forward to make.
Veronica Salfi
September 12, 2019 at 10:11 pmDoes it fade over time?
Ava
September 22, 2019 at 2:22 amI love this! My new DIL is into Steam Punk and requested I do steam punk wedding cake! I did however, have difficulty finding really large molds (had to be edible), though I searched the net extensively. (Like the “clock” at the top of your canvas).
Do you know where these can be found?
I’m inspired to do something similar for them for Christmas.
Kind regards
Ava
Ava
September 23, 2019 at 9:50 pmThank you for the info. What material is the clock face made from?
My experience with this type of silicone mold is that they are very shallow – o.k. for icing, but what else?
Many thanks
Ava
Anita Holland
September 24, 2019 at 1:55 amFor this project, the clock is made from cardboard. I used a Cricut cutting machine and cut the clock 6 times and glued the layers together. That is what makes it look 3D
Nianna
December 22, 2019 at 1:28 pmWhat glue(s) are you using?
Anita Holland
December 23, 2019 at 7:34 pmHi Nianna, I use a combination of multi purpose glue, tacky craft glue and a hot glue gun. It will all depend on the weight of the item I want to attach. For heavy items hot glue works better and the tacky glue for light items.
Ava
September 24, 2019 at 3:33 amYes, sorry I realised that after posting. Great little machines – might have to shout myself one!
Anita Holland
September 24, 2019 at 11:38 pmThey are amazing machines with so many uses. I highly recommend buying one.
Ava
September 24, 2019 at 11:44 pmGood morning Anita! I have found an almost new Cricut on our local community newspaper (NZ). Yeehah – reckon this will be my Christmas present to myself. Thank you very much for being so generous with your information and help
Have a great day!
Regards
Anita holland
September 25, 2019 at 1:20 amThat is great, you will have loads of fun. I have a few cricut projects on my website under crafts if you want ideas.
Michelle Leslie
April 5, 2021 at 9:31 pmThat’s so special, Anita. You can see you put so much thought and love into the canvas and I’m in love with your homemade pastes. Those colors are amazing.
Anita Holland
April 6, 2021 at 3:33 pmThank you so much Michelle, My son gets Married on Friday so I will have to come up with something for him.
Creative Collage Art Ideas for Adults – Christmas Decorations Blog
August 5, 2023 at 7:36 pm[…] Mixed Media Wedding Canvas […]