
I know what you are thinking, NOT ANOTHER IMAGE TRANSFER TUTORIAL but this is a bit different from other methods because the image is in the center of the wood which creates a whole new set of problems. As I found out first hand while making this Ned Kelly patio cooler. I searched the Web for a way to do this but I could not find one with images in the center, so hence this tutorial. I tried a couple of methods to do this project and have discovered a few since that I will share with you. These graphics were done many times before I was happy with them.
How to transfer an image or photo
**This post may contain affiliate links. Which means I earn a small commission on links used at no extra cost to you. Please see my disclosure policy for more information.**
Mod Podge
At first, I thought this method was perfect. The instructions say to apply the mod podge to the surface that will receive the image. The place your image face down and smooth with a brayer or credit card and leave it to dry for 24 hours. Once dry spray with water or dampen with a cloth until you can see the image through the paper. Then gently rub with your fingers to remove all the paper.
While this method worked great to transfer the image the chances of getting a distressed look is very high. I rubbed really softly but I still lost parts of the image which was not the look I wanted for this project. It is very hard to get good coverage around the edges because you need to hold it down and where you hold it down you wipe off the mod podge. So if you want a good solid photo the full size of your piece of wood, cut your photo larger than your piece of wood so you can cut away the excess once it is dry.

Prepare the wood
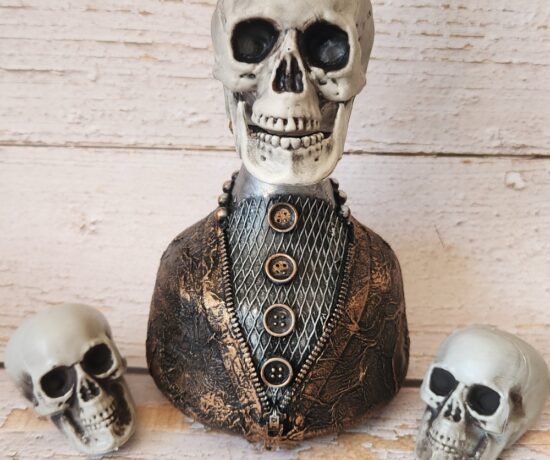
Many factors come into play if you want a good image. Before you apply the image, your wood must be sanded smooth. If the surface is not nice and smooth the ink will rub off and you will get that distressed look. Your wood needs to be sanded very smooth or the image will look distressed, and you will lose parts of the image. If you do not apply the mod podge evenly, where you have too much or too little mod podge, part of the image can be lost when rubbing. The wood on some parts of this chest was slightly rougher (the yellowish bits in the image below) than the rest, so the mod podge did not stick properly. I also had some problems removing all the paper I always seemed to have a slight paper residue. (The white in the image below)

If you are adding graphics to the center of a piece of wood, make sure all the excess paper is cut away and tape around the graphic, so you don’t get Mod Podge on the wood around the graphic. I positioned the graphics where I wanted them and then added the tape around the graphics.

I then added the mod podge to the inside of the tape and added the images and let it dry for 24 hours.

This is how the mod podge, as well as the gel medium, looked once it was varnished without using tape.

Transfering text
For transferring any type of text, I found this method unsuitable because the gel between the words can be seen on the wood. And once varnished this will not look good. I also found that I got a black “halo” around the text from the water and the rubbing, I am guessing this is from the colour in the text. My graphics were photocopied and some printed on a laser-jet printer and some on an inkjet printer.

Another issue I found was where I had applied the mod podge too thick it turned white while I was rubbing almost as if it was reactivated. In these areas, I did lose some of the colours in the image. So, make sure you apply an even coat for good results.

So, all in all this product worked great for image transfer if you were happy with a distressed look. The downside to mod podge is that you need to leave it to dry for at least 24 hours. Don’t be tempted to remove it earlier, you will regret it. I also found the rubbing to be messy and very time-consuming.
Gel Medium
I had all the same issues with the gel mediums that I had with the mod podge. I got slightly better results using the gel medium when transferring the image, I did not lose as much of the image. It was also unsuitable for text because it sealed the wood and prevented the varnish from penetrating the wood.
Even when I cut away all the excess paper around the graphics, once the bubbles were removed with a brayer excess gel would still come out the sides making a mess. And wiping it straight away still allowed some gel to seal the wood. This was resolved by using masking tape around all the graphics so and excess gel would go onto the tape and not seal the wood. Brush or foam sponges left marks in the gel medium, which spoilt the look of the graphics. So I used my fingers in the end, I got a much smoother look.

I did try a few different products and the only Gel that I found worked with text was the Faber Castell gel medium. 

The Derivan gel medium was far too thick and very hard to get an even coat. Another gel medium I tried was Mont Marte Gel medium, this was the cheapest of all the gels I tried was easy to get in the budget stores and worked well too.

Removing the backing paper
A tip for removing the paper using gel medium and mod podge is to spray the paper with water do not soak it. You can push a damp cloth into the paper and leave it to sit for about 5 minutes until you can see the image coming through before you start to remove the paper.

If you see white patches like below you need to wet, it some more. Another handy tip is to start on the inside of the graphics and work your way out. I started at the bottom and too much rubbing along the line where the gel ends caused the image to rub away. Do not try and remove all the paper in one go.

The only way I found to add the text was to put the text on top of a block graphic. I did try to cut around the text and add the gels to the cut-out text, but the paper became soft once the gel was applied it fell apart.

I found the process the same as the mod podge the only difference I found was the quality of the final image. But saying that the product that worked best for me, in the end, was the Faber Castell gel medium. It was one of the cheapest and the easiest to use. It was nice and thin so there were no streaks in the gel.
Temporary tattoo paper

This method works so great I can’t shout out about it enough. I made these PVC pipe photo planters and wanted to add a photo of my niece so she would know which planters were for her to look after. After all the trouble I had to do my Ned Kelly Cooler this method worked in minutes, no waiting, no rubbing, and no mess. You can buy the temporary tattoo paper in A4 sheets which are a good size for an image. All you need is an inkjet printer. You select the image you want and reverse it and print onto the temporary tattoo paper.

The tattoo paper comes in 2 sheets one you print on and one you use to transfer the image. Next, you peel the backing paper from the transfer sheet and smooth it over the printed sheet. Rub all the bubbles out with a credit card.

Cutaway all the excess paper, remove the clear film and place the image face down. Once in place, it cannot be removed.

Wet a cloth and wring out the water and push the damp cloth onto the white paper. Leave for 20 seconds and peel off the white paper.

If you have any wrinkles or creases gentle smooth them out with your fingers. You can add some mod podge to seal in the image or clear acrylic spray. There is no waiting, mess or rubbing with this method.
Waterslide paper
I used this method on a pet automatic cold water feeder I made for my dogs. This method is very similar to the temporary tattoo paper the application of waterslide paper is just slightly different. You print your images as you would using a regular printer you just replace the paper for waterslide paper. You do not need to reverse any images. Once printed you add 2 coats of acrylic spray to seal in the image.

Cutaway the excess border so you have the image only.

Put some water in the sink and add the image, it will curl up straight away which is okay. Once you can see the image through the white backing paper your image is ready for transfer, his take approximately 15 seconds.
")
The image will now slide off the backing paper. Place the image in the correct position and slide out the white backing paper.

Use a soft cloth and GENTLY wipe all the water and bubbles out of your image. And gently flatten all the edges. Make sure your wood is clean and smooth before adding the transfer, as you can see I did not, but it still worked great. Let the image dry and then add 2 coats of clear acrylic spray or mod podge spray to seal your image in place.

These are the 4 methods I have used some are more suited to a particular project.
Cricut Vinyl cutter


If you are looking for any of the items used in this project, please consider using our links. By clicking on the links we will earn a small commission at no extra cost to you. Which helps us come up with new and exciting ideas to share with you. Please feel free to share or leave a comment we would love to hear your thoughts.

No Comments