
Looking for a unique way to add personality to your furniture? These resin door knobs are fun to make and customisable to suit any theme. From steampunk to beachy or industrial, you can create a variety of knobs using small items you probably already have. I’ve made a few before using steampunk charms in cake moulds, and they were a hit. But I’ve often been asked, What else can you embed in resin?

This project explores just that. I experimented with different fillers using epoxy resin and ping pong balls as moulds. Some worked brilliantly, and others—not so much. But each one gives you inspiration for your designs.

Before we dive into this tutorial, be sure to subscribe to my bimonthly newsletter to be the first to see my latest projects. You can also follow me on Pinterest and Facebook where I also include my unique mixed-media art projects.
How to make resin doorknobs
*This post may contain affiliate links. Which means I earn a small commission on links used at no extra cost to you. Please see my disclosure policy for more information.**
Materials Needed
- Ping pong balls or silicone moulds
- Epoxy resin
- Measuring cups and mixing sticks
- Small embellishments (shells, charms, bolts, beads, etc.)
- Bolts (for attaching knobs later)
- Chopsticks or pencils (for supports)
- Tape
- A tray or container to hold the balls steady
- Acrylic spray (for finishing)
- Craft knife
- Butane torch or straw (to pop bubbles)
Setting Up Your Resin Moulds
I accidentally bought 300 ping pong balls, so I’m putting them to good use! Their round shape makes great small knobs, and they use less resin. If you don’t have ping pong balls, silicone moulds also work well.

To hold them upright while curing, sit them in a baking tray or similar container. You’ll also need a way to suspend bolts in the centre of each ball. I taped chopsticks together and spaced the bolts between them, easy and effective.
")
Cutting the Balls
Don’t just cut randomly. Slice the top of the ball, keeping the seam in the centre. This ensures it won’t show as badly in the final finish.

Choosing What to Embed in Resin
You can embed almost anything, as long as it’s clean and dry. I found a mix of items from my workshop and craft stash:
- Pebbles
- Sea shells
- Plastic beads
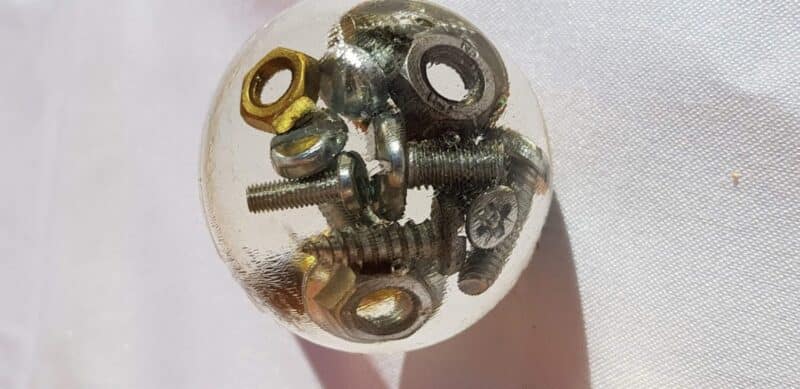
- Nuts and bolts
- Steampunk charms
- Thumbtacks

Smaller moulds like ping pong balls make it tricky to keep items in place. Objects often shift and sink toward the centre. To get the best result, gently move the contents around and fill all the gaps. When using beads or charms, place them with the decorative side facing down; this will be the visible side once the resin sets.
Mixing and Pouring the Resin
Mix your resin according to the manufacturer’s instructions. I always mix for at least five minutes to make sure it’s fully blended.

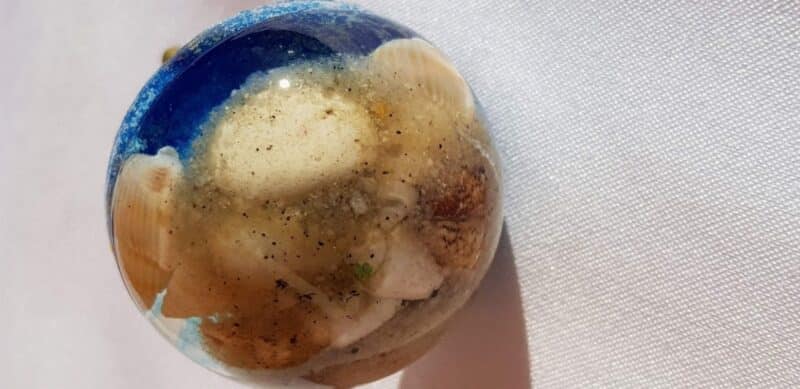
Pour slowly down the inside edge of the moulds. This helps reduce bubbles and keeps the items from shifting too much. For one knob, I tried a beach theme using pigment to colour the resin. I learned the hard way—add sand last, not first! All the sand sank to the bottom, covering all the seashells from view.

Securing the Bolts
Once poured, insert your bolts and balance them between chopsticks or pencils. Centre them so they sit halfway into the resin. Tape everything in place to stop movement.
")
Bubbles will form after a few minutes. Use a small torch to burst them, or blow through a straw for small batches.
Unmoulding and Finishing
Wait 24 hours for the resin to fully set. Use a craft knife to peel off the ping pong balls. Silicone moulds usually give a glossier finish, so I added a coat of acrylic spray for shine.
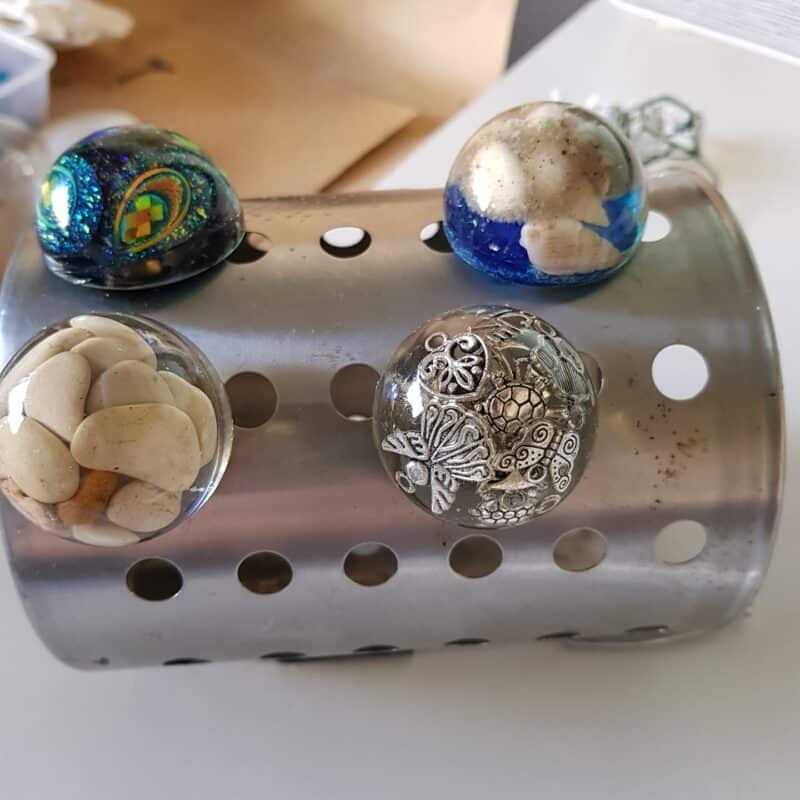
To hold the knobs upright for spraying, I used a kitchen utensil holder. A piece of scrap wood with drilled holes also works well.
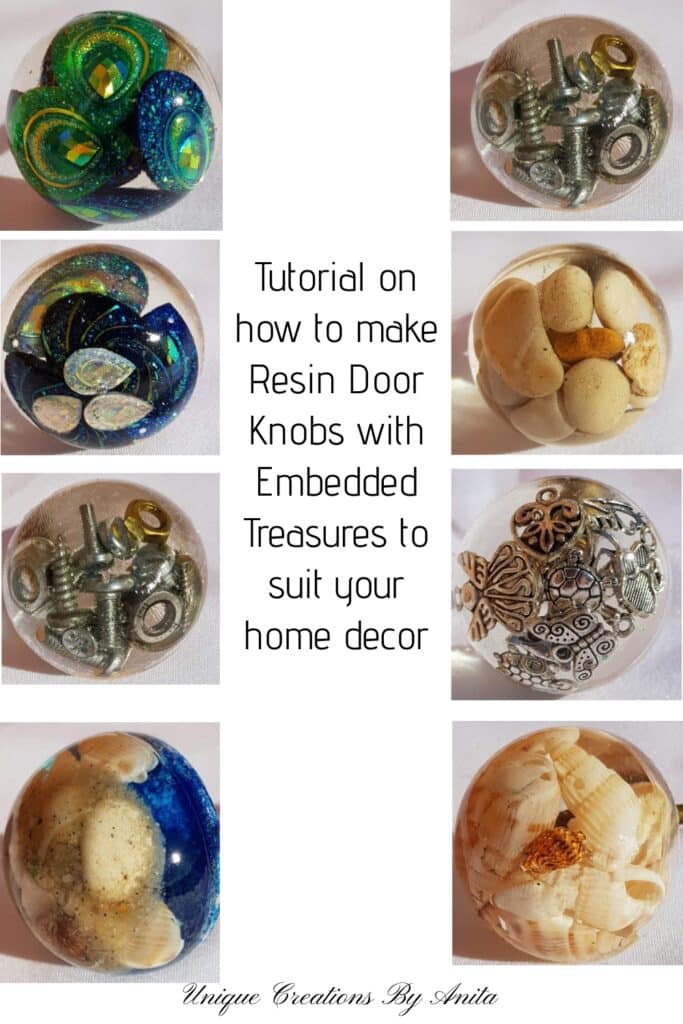
Finished Resin Door Knobs
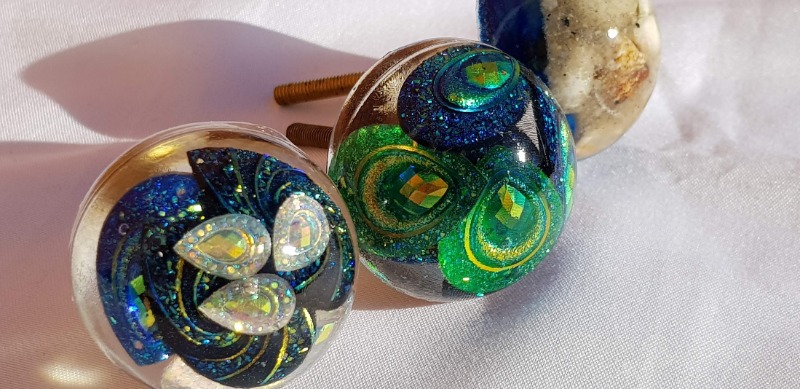
Each knob has its own personality: Peacock beads – My favourite. Colourful and vibrant.
Shells & Pebbles – Perfect for beach-themed décor.
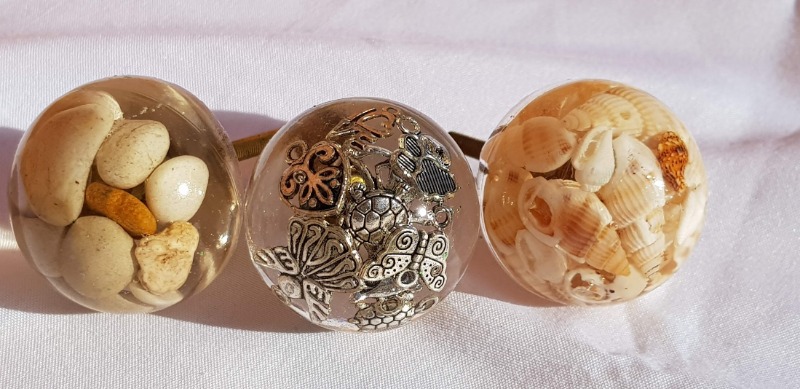
This doorknob shows how all the thumbtacks sank to the bottom. If I’d added more, it could’ve looked great on an office drawer.
I had high hopes for this one, I wanted it to resemble a beach scene with blue ocean, sand, and shells. Looking back, it may have worked better if I’d poured the blue resin first and let it partially set before adding the shells, then the sand.
More resin projects
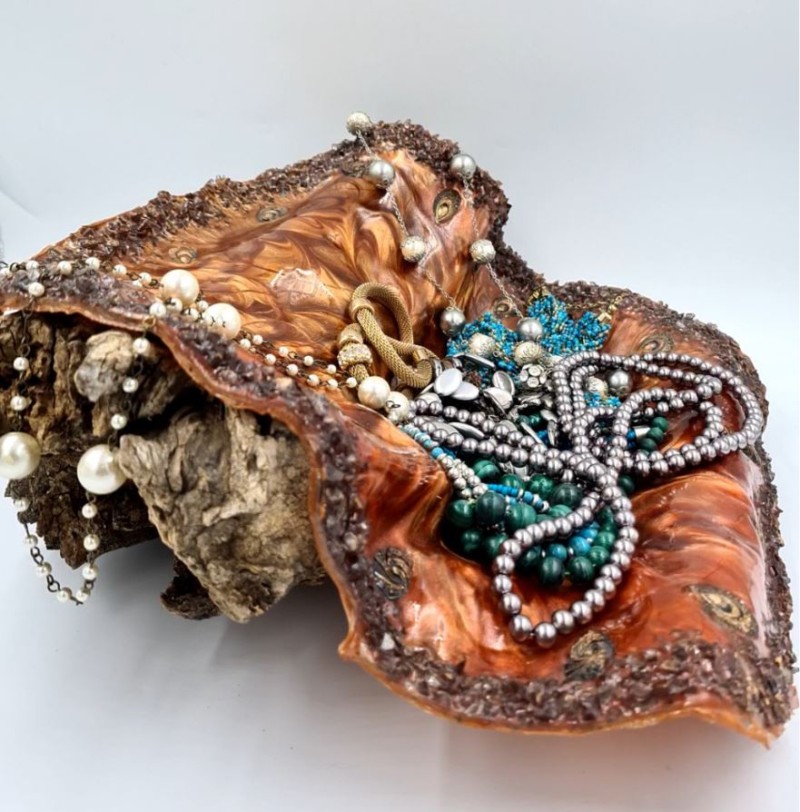
This was an experiment to see if I could shape resin into a new form and create a bowl for storing small items.
If you have some resin leftover and you are looking for more ideas. This wooden suncatcher was made from scrap wood and coloured resin.


If you’d like to find any of the items used in this project, we’d greatly appreciate it if you used our affiliate links. These links provide us with a small commission at no extra cost to you, allowing us to continue creating and sharing more inspiring projects. We’d also love to hear your thoughts—feel free to leave a comment or share this post!
42 Comments
Mr Stark
July 31, 2019 at 7:51 amit’s an awesome idea. I think just got an idea for something… Thank you so much for sharing your project!
Anita Holland
August 1, 2019 at 1:11 amThank you
Mr Stark
August 2, 2019 at 4:57 amit’s my pleaser
Michelle
July 31, 2019 at 4:37 pmThese are all just fabulous! You are definitely piquing my interest in this art form.
Anita Holland
August 1, 2019 at 1:14 amThank you! When you see it done you can always imagine your own ideas.
Mother of 3
July 31, 2019 at 7:56 pmThese are beautiful! I love the one with the beads– it reminds me of a peacock. Pinned.
Ann
August 1, 2019 at 10:40 pmVery pretty –
Anita Holland
August 1, 2019 at 11:32 pmThank you!
Kippi
August 3, 2019 at 1:13 pmCool project I am thinking of all the possibilities for knobs I would like to try. Pinned!!!
Have a great weekend,
Kippi
Ps. Please pin this to the YTS link party https://kippiathome.com/2019/07/28/youre-the-star/
Anita Holland
August 4, 2019 at 9:46 pmThank you so much. I will pin.
Donna @ Modern on Monticello
August 6, 2019 at 2:12 pmI have used resin before but never to make such creative door knobs. Thanks for sharing this great idea with us at #HomeMattersParty
Anita Holland
August 6, 2019 at 11:50 pmThank you so much for your lovely comment.
Create With Joy
August 7, 2019 at 8:19 amThese are so cool Anita! Your beautiful doorknobs immediately caught my eye at my WW party (thanks for linking up!) This would be perfect to share at our Inspire Me Monday party as well! 🙂
Anita Holland
August 8, 2019 at 2:30 amThank you so much for your kind comments. I have made a little roster for posting so I can keep track and not post the same projects at every party. I will be posting it at your party too.
Dee | Grammy's Grid
August 7, 2019 at 3:44 pmThanks so much for linking up at the #UnlimitedMonthlyLinkParty 3! Shared.
Anita Holland
August 8, 2019 at 2:32 amThank you and thanks for sharing.
Tea With Jennifer
August 16, 2019 at 12:26 amI love these, how clever! I have just the place to make these for my kitchen cupboards!
Thank you 😀
You’re most welcome to join me in a cuppa,
Jennifer
Anita Holland
August 17, 2019 at 10:13 pmThank you so much
Liberty
August 16, 2019 at 4:46 amI like the peacock one the best! (I can’t remember if I already commented here or not….) Thank you for sharing at the Best of the Weekend– I am featuring you tomorrow morning!
Liberty @ B4andAfters.com
Anita Holland
August 23, 2019 at 6:51 amThank you so much and sorry for the late reply. Went to my spam folder.
Ann
August 17, 2019 at 11:36 pmBeautiful! Thank you for sharing at Party In Your PJ’s!
April J Harris
August 19, 2019 at 1:42 pmPinning! These are beautiful! I had no idea that you could make DIY door knobs, and your step by step instructions are great. Thank you for being a part of the Hearth and Soul Link party!
Anita Holland
August 19, 2019 at 9:40 pmThank you so much for your kind comments.
Anita Holland
August 23, 2019 at 6:49 amThank you so much, they are really very simple to make.
Dee | Grammy's Grid
September 1, 2019 at 5:38 amCongrats! Your post is FEATURED at the #UnlimitedMonthlyLinkParty 4. Party open now!
Anita Holland
September 2, 2019 at 11:29 amThank you for the feature it means a lot when others like my projects.
Suhana Morgan
January 22, 2020 at 10:20 amwow, such a beautiful doorknob design. I never thought about making these DIY door knobs making method. I really surprised by you. Seriously, All of these knobs are looking nice.
Anita Holland
January 23, 2020 at 1:04 amThank you so much, you can put almost anything in them to suit your needs.
Suhana Morgan
January 22, 2020 at 10:22 amwow, such a beautiful doorknob design. I never thought about making these DIY door knobs making method. I really surprised by you. Seriously, All of these knobs are looking nice. I absolutely and completely love your new door knobs
Anita Holland
January 28, 2020 at 6:37 amThank you
Alvie
April 23, 2020 at 3:25 pmBeautiful! I saved this previously and now with the virus stay-at-home order it’s the perfect time to try this out. I’m going to use the knobs to display our baseball cap collection.
Anita Holland
April 27, 2020 at 8:58 amThank you so much. That is the great thing about this project, it can be adapted to suit your needs.
Michelle Leslie
August 3, 2020 at 9:17 pmI’m just getting into the whole resin thing. Somethings it works like a charm and other times it’s a complete flop. Seeing your amazing doorknobs has me praying real hard that mine will look just as good 😀 Love that blue green one soooo much. It looks like you’ve captured a peacock’s feather in a bubble. WoW!!!!!
Anita Holland
August 3, 2020 at 10:58 pmThank you so much, Michelle. One bit of advice to prevent flops it is the mixing process.When mine flop it is always because I did not mix it well enough or for long enough.
How To Make Resin Door Knobs And Pulls – Home and Garden
August 9, 2020 at 12:00 am[…] Resin Doorknobs […]
Anita Holland
August 10, 2020 at 5:32 pmThank you for the shoutout on my post.
23 Resin Crafts to Sell for Huge Profits in 2022 (+ Resin Business Ideas for Success)
April 17, 2022 at 4:43 am[…] How gorgeous are these resin door knobs from Unique Creations by Anita?! […]
DIY Seashell Crafts To Make This Summer | DIY Make To
June 11, 2022 at 10:29 pm[…] Click Here […]
Linda
October 1, 2023 at 6:03 amWith the ping pong ball cut in half, how does the finished form get round??? ,,, probably a stupid question, but…
Anita Holland
October 11, 2023 at 6:44 amThe door knows are only half circles.
40 DIY Seashell Crafts To Make This Summer - DIY Crafts
November 30, 2023 at 5:11 am[…] Click Here […]
37 DIY Seashell Crafts That Look Awesome - Craftsy Hacks
December 2, 2023 at 12:50 am[…] 13. Resin Door Knobs […]