
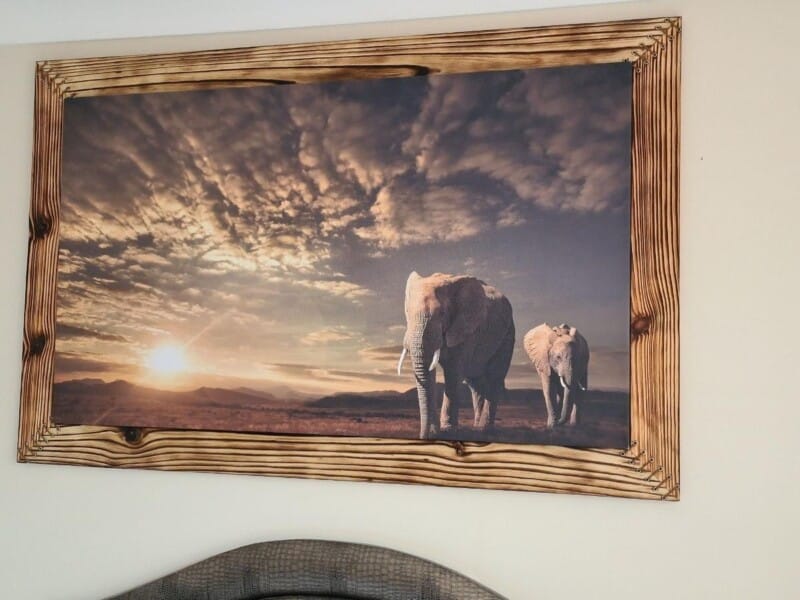
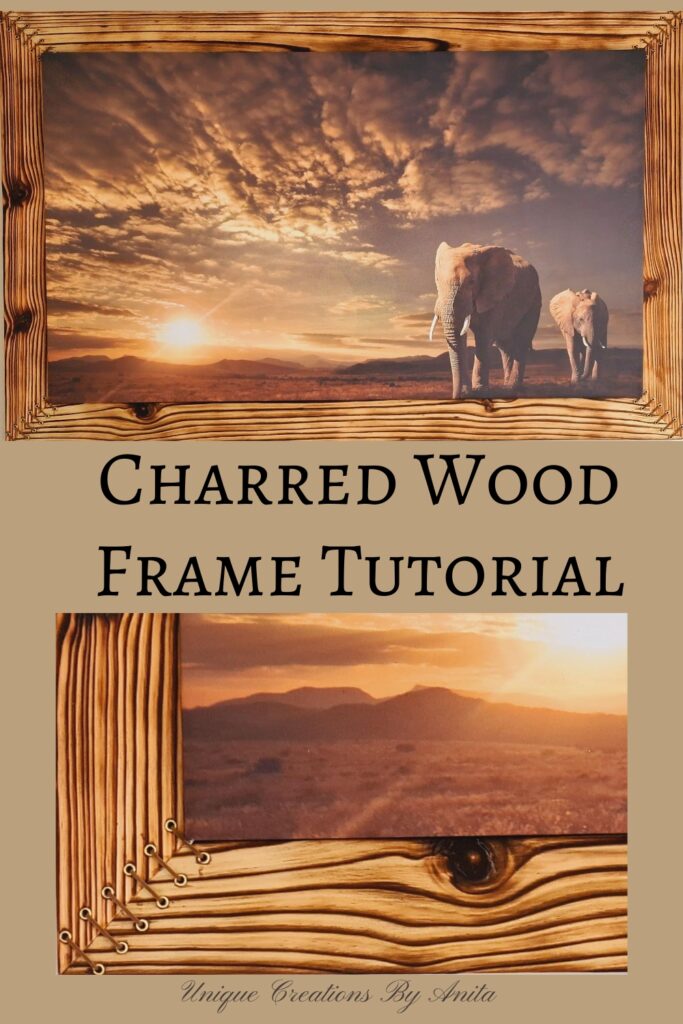
This DIY Shou Sugi Ban picture frame marries the ancient Japanese art of wood charring with my love of the South African bush. After discovering the technique on Pinterest, I couldn’t resist giving it a go, even as a complete beginner. I kept things simple; I chose a Shou Sugi Ban picture frame as my first project. I used dramatic burnt timber to frame a ‘Walking in Savannah’ canvas sponsored by Photowall, bringing my bedroom to life.

Before we dive into this tutorial, be sure to subscribe to my bimonthly newsletter to be the first to see my latest projects. You can also follow me on Pinterest and Facebook, where I also include my unique mixed-media art projects.

What Is Shou Sugi Ban?
Shou Sugi Ban is an 18th‑century Japanese method of preserving wood by charring its surface. Traditionally used on cedar (Cryptomeria japonica), the wood is burned until charred, then coated with oil. The result is a pest and rot‑resistant, water‑repellent finish with dramatic charcoal colouring. Modern makers adapt the technique to create striking textures and contrasts on various wood species.
Stunning DIY Shou Sugi Ban Picture Frame Tutorial
*This post may contain affiliate links. This means I earn a small commission on links used at no extra cost to you. Please see my disclosure policy for more information.**
Materials Needed
- Scrap timber or cedar planks (decking boards work)
- Thickness planer or sandpaper (to level decking ridges)
- Blowtorch
- Wire brush (hand‑held)
- Coarse nylon flap brush (drill attachment)
- Drop saw (45° bevel cuts)
- Pocket hole jig, screws and wood glue
- Metal brace plates
- Leather laces and shoe eyelets
- Multipurpose glue
- Clear wax or natural oil (for sealing)
- Self‑adhesive velcro tape
- Protective metal sheets or a stand‑alone work surface
- Safety glasses and a respirator
- Craftsman restorer
Find and Prepare Wood
I tested different scraps to see how each timber burned. Pine gave me the deepest, most dramatic charring effect. My scrap decking planks were rough, so I ran them through a thickness planer to remove ridges and equalise thickness.

Safety Precautions
Protect your work surface with metal sheets or work outside on concrete. Keep flammables well away. Wear safety glasses and a respirator if you burn large pieces in a confined space. I prefer MAP gas because it has a higher flame temperature and chars wood faster than propane or butane, although both alternatives can still get the job done.
Burn the Wood
Begin at one end and torch steadily along the grain until the surface cracks and bubbles. Don’t forget to char the edges for an even finish, repeating this on every frame piece. Tip: Keep the flame moving—if you linger in one spot, the timber can overheat, crack along the grain or bow on longer lengths.

Remove the Charred Layer
Use a wire brush to scrub away every flake of char, working with the grain to unveil the clean wood beneath. This step is wildly messy—best tackled outdoors—since you’ll end up caked in soot; my husband joked I looked like a miner, with only my goggles and mask shielding my face.

After brushing away the charred surface (see image below), you can start digging past the burnt layer to reveal the natural wood colour beneath.

Hold the drill‑mounted nylon flap brush flat against the timber and work with the grain. Vary your number of passes to strip away more—or less—char; either way, the grain lines will remain a deep, rich black.

It is hard to tell from the image below, but the lighter wood is at least 3mm deeper than the darker wood. So you have some great texture on the surface.
Update: I’ve become completely hooked on Shou Sugi Ban and have crafted many unique projects using this technique. If you plan to char wood regularly, I highly recommend swapping your wire brush for a Craftsman Restorer tool—it clears away all the charred wood in a fraction of the time.

You’re free to leave the timber its natural shade or apply coloured stains for a customised finish—this time I’ve kept it bare. I have experimented with adding colours to Shou Sugi Ban; you can see my results in this tutorial.
Cut and Join the Frame
Measure your canvas (1200 mm × 700 mm) and cut timber at 45° angles on a drop saw.

Use a pocket hole jig, glue and screws to join corners tightly.

Add metal brace plates for extra support if you are doing a large frame like mine. I chose to let the canvas sit slightly raised above the frame for added depth.

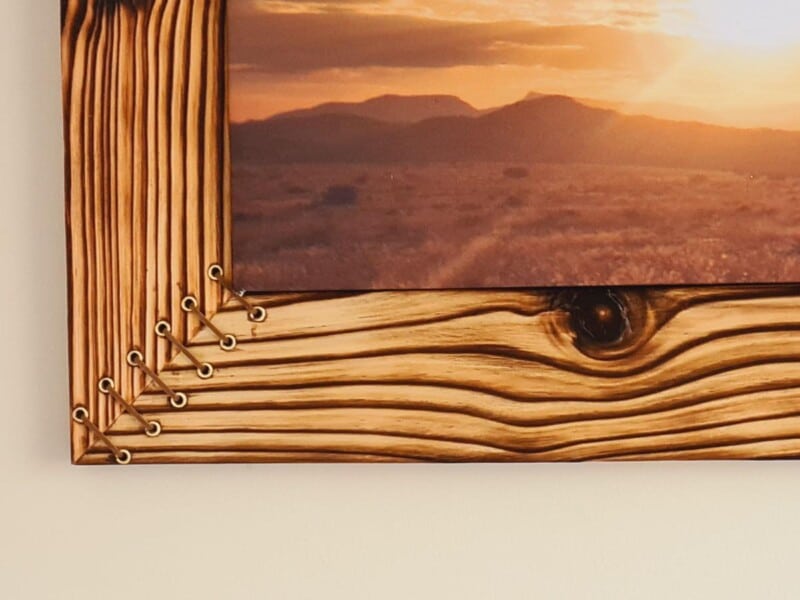
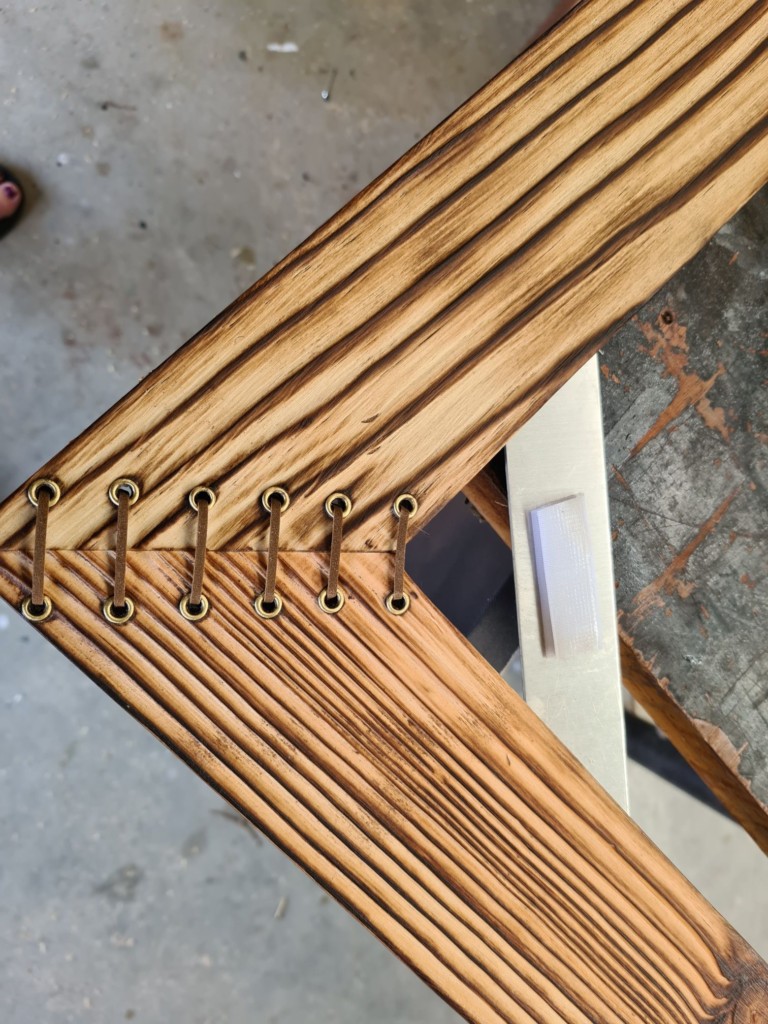
Adding the laces
For a custom touch, I threaded leather laces through each corner. First, I cut a scrap piece at a 45° angle and marked my hole positions on it. Then I used that offcut as a drilling template to ensure perfectly even spacing on every corner.

If you’d prefer to skip the laces, burn the corners a bit darker for definition—but be cautious: I tried this first and found the deeper char overwhelmed the leather, so I sanded mine back to a lighter tone.

I inserted shoe eyelets for a clean, professional finish. Using a drill bit sized to the eyelet barrel, I drilled each hole, pressed in the eyelets with a dab of multipurpose glue, and wiped away any excess adhesive for a crisp look.

Sealing the Wood
Although Shou Sugi Ban finish is naturally durable, I chose to seal mine to even out the colour variation—my side planks had a warmer, orange tint compared to the top and bottom pieces. I tested clear wax on offcuts and found it blended the tones beautifully.

To seal, apply a thin layer of clear wax with a rag or soft brush, rubbing it into the grain. Let it sit for a minute, then buff off any excess with a clean, soft cloth. This simple step harmonises the hues and adds a subtle, protective sheen.

You can now thread the laces through the holes and staple the ends to the back of the frame.
Add Back Supports
Since the canvas isn’t boxed into the frame, I fashioned sturdy back supports from aluminium scraps left over from my wine barrel tables. I cut each strip to size and screwed them across the back corners, then applied self‑adhesive Velcro tape to both the canvas stretcher and the aluminium braces to hold the artwork securely. This setup also makes swapping prints effortless—just peel off one canvas and stick on a new design from Photowall’s extensive collection whenever you’re ready for a fresh look.
Completed Shou Sugi Ban picture frame
More shou sugi ban project Ideas
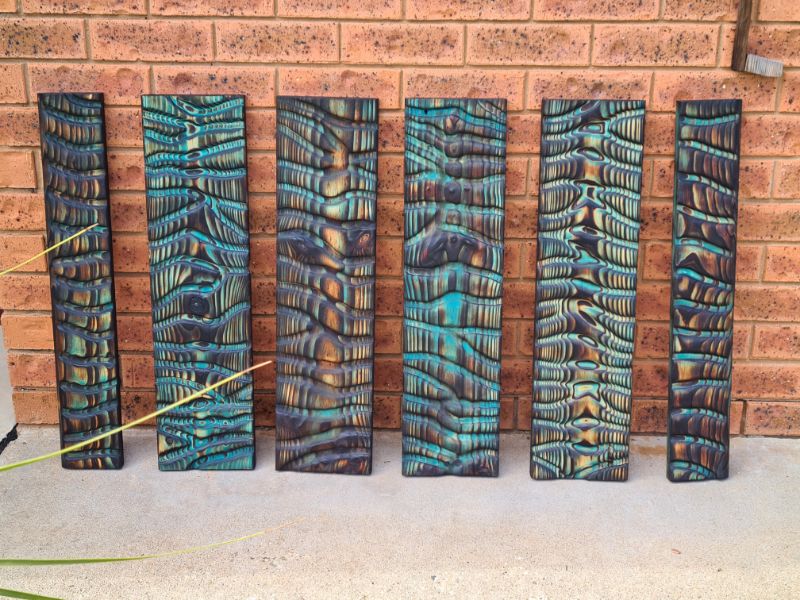
Driven by my artistic instinct, I immediately tackled a Shou Sugi Ban wall‑art piece. For this project, I repurposed scrap wood, stained each offcut, and arranged them into a striking mosaic design.
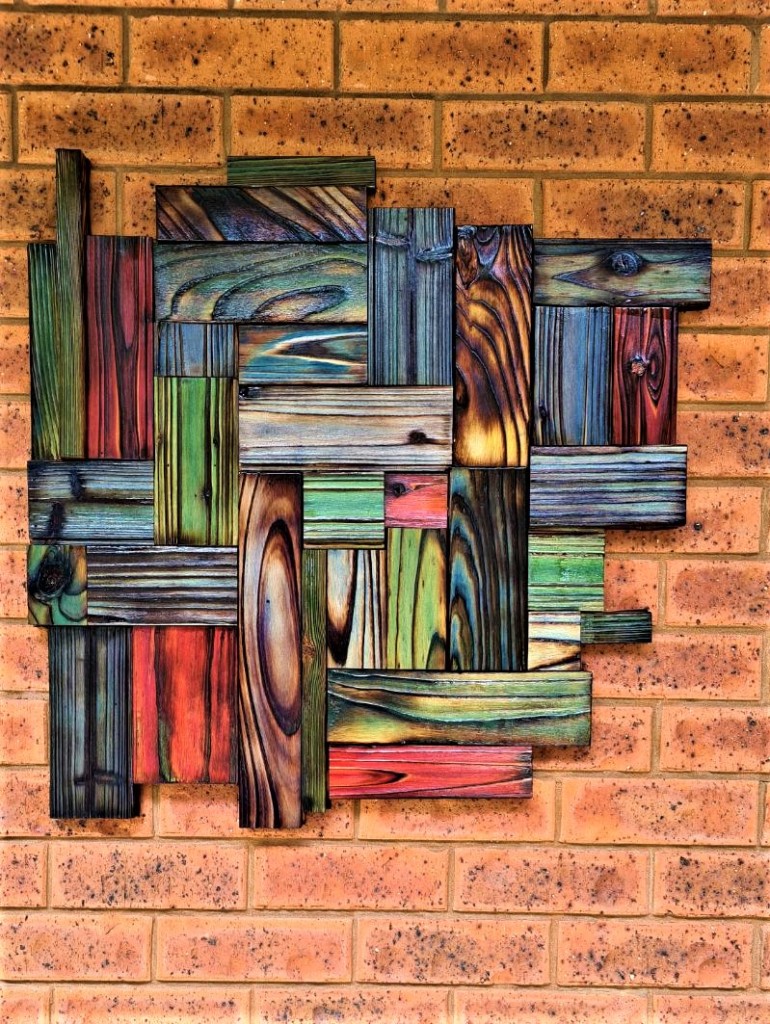
I achieved a mesmerising abalone effect by routing grooves into the Shou Sugi Ban surface, then applying a single coat of colour that revealed a rich spectrum of hues. For more ideas, search Shou Sugi Ban in my search bar.

If you’d like to find any of the items used in this project, we’d greatly appreciate it if you used our affiliate links. These links provide us with a small commission at no extra cost to you, allowing us to continue creating and sharing more inspiring projects. We’d also love to hear your thoughts—feel free to leave a comment or share this post!


48 Comments
Michelle Leslie
March 15, 2021 at 10:18 pmA laced-up, char-grilled frame of the bushveld. What’s not to love, Anita. I swear we’re connected in the cosmos somehow or another. We’ve been playing with shou sugi ban too, but we just did our pieces on the braai 😀 And the wood takes on a whole new look. I was so surprised by how incredibly beautiful it looks. Oh BTW thanks for the flapper attachment tip. My arms are still wobbly after using the steel brush attachment on ours. It’s definitely a good work out
Anita Holland
March 16, 2021 at 4:53 pmThank Michelle, Our ideas are very similar. The last time you were doing the planter I was doing one similar so I have held mine back. I tried it with a few flames and the propane worked the best because it burns deeper so you get more texture. And that Coarse flap brush is a total game-changer it works so good but my hands still get tired holding the drill.
Brooke
March 15, 2021 at 10:59 pmWhat a beautiful frame. I couldn’t wait to keep scrolling down and read more. I just love projects like this one. Thank you for sharing your step by step and amazing photos.
Sara
March 15, 2021 at 11:01 pmThat burned effect and lace up on the wood looks amazing and I actually like the two-toned wood. We’ve always wanted to try shop sugih ban; hopefully once the weather improves here!
Maria
March 15, 2021 at 11:42 pmThis is beautiful this is what I’m looking for to make rustic frames
Anita Holland
March 16, 2021 at 6:11 pmThank you Maria, you should have a try very easy, just very messy.
Angie @ Postcards from the Ridge
March 15, 2021 at 11:50 pmOh my goodness this is such a beautiful frame. I’ve never heard of this technique bit it’s so interesting. I love how you finished off with the laces.
Anita Holland
March 16, 2021 at 6:12 pmThank you so much Angie, I just came across it by accident too and thought I would give it a try. I have a few projects done and they are all stunning.
Pam
March 16, 2021 at 12:22 amThat’s really beautiful. Great job!
Anita Holland
March 16, 2021 at 6:14 pmThank you so much Pam, It is even nicer in reality because you can see all the deep grooves in between the grain.
Deana Landers
March 16, 2021 at 12:49 amAnita, what a wonderful scene to have about your bed. The cjar burned frame is earthy and complimentary. I love it.
Anita Holland
March 16, 2021 at 6:15 pmThank you Deanna, I am very non-traditional in my bedroom decor. I usually have tigers and African scenes on that too.
Linda Johnston
March 16, 2021 at 1:38 amBeautiful frame! Thanks for the details too.
Anita Holland
March 16, 2021 at 6:15 pmThank you so much Linda, that is so kind of you to say.
Lalka Crochetka
March 16, 2021 at 6:39 amthe frame is stunning! it fits perfect to the canva with elephants <3
Anita Holland
March 16, 2021 at 6:18 pmThank you so much, soon as I say the canvas I knew I wanted to try this technique. Lucky it was easy to do.
Denise @ hootshack
March 16, 2021 at 11:51 amWhat a beautiful look. I can see this in all styles of decor. I love the history of this as well. Thank you!
Anita Holland
March 16, 2021 at 6:20 pmThank you Denise, I think you can use it for any picture. With shou sugi ban you can also add colours to the wood. I will be sharing them soon.
Esmé Slabbert
March 16, 2021 at 1:25 pmThank you so much for sharing and participating at #SeniSal RT done
Anita Holland
March 16, 2021 at 6:20 pmThank you so much Esme, have a great week.
Meegan
March 17, 2021 at 1:39 amI really like this look. I never knew the name, but always enjoy the style and texture. You have done a great job with a step by step tutorial. Happily pinning for future reference, Anita!
Christina Woodcock
March 18, 2021 at 6:55 amThis is beautiful Anita! I love the rustic look 🙂
Anita Holland
March 18, 2021 at 2:52 pmThank you so much, The effect is even better in reality.
NINA LEWIS
March 18, 2021 at 7:11 amYou did an amazing job on your picture frame! I’ve never heard of this type of treatment of wood. (Elephants are my favorite animal so I love your picture, too!)
Thanks so much for sharing this at our Party in Your PJs link party.
Anita Holland
March 18, 2021 at 2:52 pmThank you so much Nina, I have only just discovered it and I am addicted.
Kasia@Wooden Pallet Projects
March 19, 2021 at 1:39 amIt looks amazing. I love the lace detail 🙂 Your projects always inspire me to come up with new ideas. Thank you!
Anita Holland
March 24, 2021 at 8:19 amThank you so much, I had to add my own personal touch to the idea.
creativejewishmom/sara
March 19, 2021 at 7:52 amWow, really stunning frame, LOVE The lacing at the corner. Never heard of this so thanks for sharing on craft schooling Sunday!
Anita Holland
March 24, 2021 at 8:19 amThank you so much and you are very welcome
Dixie
March 19, 2021 at 12:18 pmWhat an impressive frame. The picture looks beautiful in it.
Well done, indeed!
Anita Holland
March 24, 2021 at 8:20 amThank you so much Dixie, for the awesome comment.
Naush Samama
March 21, 2021 at 5:31 pmAnita, I love how you share your experiments with all of us and educate your readers with different art techniques and terms. I think, your frame looks splendid. Thank you or sharing with us at Meraki Link Party. Hope you join back this week too. Have a wonderful weekend.
Naush
Anita Holland
March 24, 2021 at 8:20 amThank you so much Naush, I love learning new techniques along the way.
Cecilia
March 22, 2021 at 8:23 amAnita, you are the queen of DIY! What a cool technique! Thanks for sharing at Vintage Charm!
Anita Holland
March 24, 2021 at 8:21 amAww thank you so much, Cecilia, your comment has made my day.
Rosemary Palmer
March 22, 2021 at 11:19 amWhat a great job – I love the rustic look and perfect for the picture.
Anita Holland
March 24, 2021 at 8:21 amThank you so much Rosemary.
Grandma's House DIY
March 23, 2021 at 2:57 amI’m featuring you this week! Thanks for sharing with us at the To Grandma’s house we go link party, happy spring!
Marilyn
March 23, 2021 at 6:55 amThank you for sharing at #OverTheMoon. We appreciate your shares. They have been Tweeted Pinned. Have a lovely week. I hope to see you at next week’s party too! Please stay safe and healthy. Come party with us at Over The Moon! Catapult your content Over The Moon! @marilyn_lesniak @EclecticRedBarn
Anita Holland
March 24, 2021 at 8:33 amThank you Marilyn.
Barbara Chapman
March 23, 2021 at 1:58 pmReally nice effect this gives your picture frame! My father used to use this technique in the early 1970’s, before I ever knew the actual name for this burning technique. Your frame and its photo turned out beautifully!!!
Anita Holland
March 24, 2021 at 8:34 amThank you so much Barbara, this method has been used for so long I think it is just becoming popular again.
Linda
March 23, 2021 at 9:41 pmBeautiful…and I learned a new word. Thank you for sharing on the Classy Flamingos.
Anita Holland
March 24, 2021 at 8:34 amThank you Linda, I learnt a new word too lol
You're the Star Blog Hop - Life as a LEO Wife
April 26, 2021 at 3:02 pm[…] Shou Sugi Ban Picture Frame by Unique Creations by Anita Chicken (or Pork) & Vegetables Skillet Meal by Scratch Made Food […]
25 Easy DIY Wood Picture Frame Ideas - Anika's DIY Life
January 7, 2023 at 3:56 am[…] Shou Sugi Ban Picture Frame from Unique Creations by […]
Mario
August 29, 2023 at 12:19 amHola Anita, felicidades por ese marco está precioso y gracias por compartir…
Solo una duda. El lienzo lo pegaste a alguna base??
Gracias
Anita Holland
September 1, 2023 at 8:41 pmThank you, I used metal brackets on the back to attach it to the frame.