
I’m a total hoarder when it comes to scrap wood, so with my heap of off-cuts growing by the day, I finally turned those tiny bits into a striking piece of DIY Scrap Wood Wall Art that you can arrange and rearrange however you like.
I envisaged a mosaic-style panel by gluing scrap wood of every shape and size onto larger boards. Because I planned to paint the entire piece, using dirty or previously painted off-cuts didn’t matter, though you’ll need to sand them if you’d rather showcase bare timber.

Those tiny off-cuts from my barn quilt projects proved perfect. For the base, I repurposed old bed slats, then raided my workshop and craft room for odds and ends. And if you’re painting yours, don’t feel limited to wood alone—I incorporated anything I could find. Below, I’ll break down every item I used.

Before we dive into this tutorial, be sure to subscribe to my bimonthly newsletter to be the first to see my latest projects. You can also follow me on Pinterest and Facebook, where I also include my unique mixed-media art projects
DIY Scrap Wood Wall Art: Upcycled Wood Mosaic for Stunning Wall Décor
**This post may contain affiliate links. Which means I earn a small commission on links used at no extra cost to you. Please see my disclosure policy for more information.**
Materials Needed
- Assorted scrap wood pieces (various shapes and sizes)
- A straight base board (e.g., repurposed bed slat )
- Mitre saw (or hand saw)
- Full-size hot glue gun & black hot-glue sticks
- Black gesso (or black spray paint)
- Paintbrush
- Silver metallic wax paste
- Clear gloss spray sealant
- Assorted mixed-media embellishments:
- Old buttons
- Broken drawer pulls
- Glass beads
- Upholstery studs
- Thumbtacks
- Resin squares
- Half pearl beads
- Halved ping-pong balls
- Wooden curtain hoop
- Wood appliqués
- Velcro Command strips or keyhole hinges
- Safety gear: gloves, dust mask, eye protection
Scrap Wood Art Base
For the base, you’ll need six long boards. I repurposed recycled bed slats and scraps from my scrap heap.
- 2 x 1.3m x 7 cm
- 2 x 1.1m x 7cm
- 2 x 35cm x 8.5cm

I set out to shrink my ever-growing scrap-wood pile—I can’t bear to throw away any off-cuts. Since I began woodworking in 2012, I’ve spent almost nothing on new timber, relying almost exclusively on reclaimed materials. Nearly every project on my blog is built from recycled materials—read this post to discover exactly how I do it.

Cut the wood to size
I used a mitre saw to cut my off-cuts quickly, but you can use any saw—it’ll just take longer. Keep each piece under 3 cm thick so they don’t stick out too much. If you want to make it more interesting, cut some pieces at different angles.

Attach Wood to the Base
I used hot glue instead of wood glue so the pieces would stick firmly when hung on the wall. Grab a large glue gun and black glue sticks so the glue won’t show through the paint. Hot glue is strong—I’ve used it on my barn quilts—and if you need to remove a scrap, you can chip it off with a hammer and chisel. Don’t sand rough wood; the rough bits look more interesting once painted. This step takes a few hours: start at the top and glue the small wood pieces onto the board in no particular order.

The plan is to affix a variety of wooden shapes onto the base, layering different forms and textures to build a mosaic-style collage.

Add Textures with Mixed Media
Stroll through your workshop and craft stash to find embellishments. I tucked in buttons, studs, beads, and appliqués into gaps. You don’t need fancy items—every piece will unite under a coat of gesso. The peppering of objects creates depth and intrigue. Here are some of the items I used.
- Old buttons
- Broken drawer pulls
- glass beads
- upholstery studs
- thumbtacks
- resin squares
- half pearl beads
- Ping pong ball cut in half
- wooden curtain hoop
- wood applique

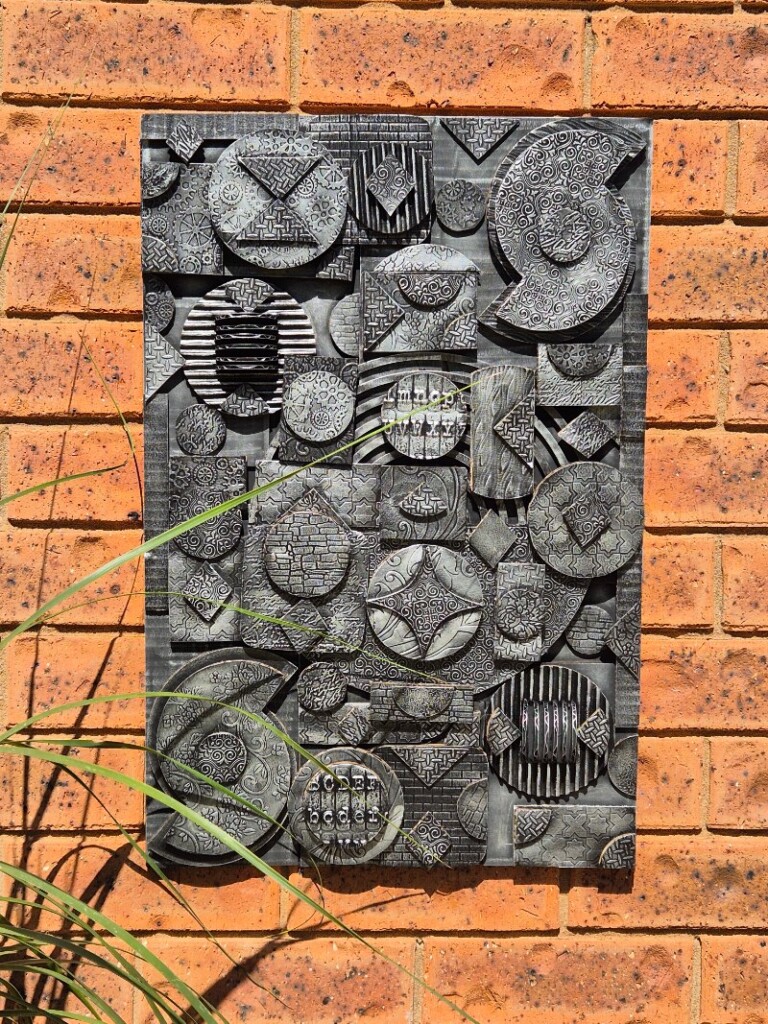
You can zoom in on the images below to see how I layered and used everyday items to create different textures.

It may look a little chaotic now, but once you paint it, all the elements will blend into a cohesive work of art.

Paint with Black Gesso/Acrylic paint
Brush on a rough coat of black gesso, embracing imperfections. Messy strokes highlight wood grain and glue textures. If you have black spray paint, feel free to use that instead for a quicker finish. Allow at least an hour to dry completely.

I thought it looked interesting like this, but I wanted to add the silver to highlight the texture.

Highlight with Silver Wax Paste
I picked silver because it suits my home décor. Wax pastes come in many colours, but if you don’t want to buy different tins, you can make your own at home—see the recipe in this Post.

Use metallic silver wax paste to highlight the raised areas. Dip your fingertip into the wax and gently rub it over the raised surfaces—don’t cover all the black or the effect will be lost. For tight spots, use a small, soft paintbrush to lightly apply the wax.

The photo below shows how rough painting adds texture. I just slapped paint on the ping-pong ball and the chevron wood piece. Messy hot-glue trails look great, too. After you apply the silver wax, let it cure for 12 hours.

Seal and Hang
Spray two even coats of clear gloss sealant to protect the paint and wax. Once dry, mount on the wall using Velcro Command strips (holds up to 4 kg) or keyhole hinges if you don’t mind wall holes. When you tire of the design, easily swap or remove strips with no damage.

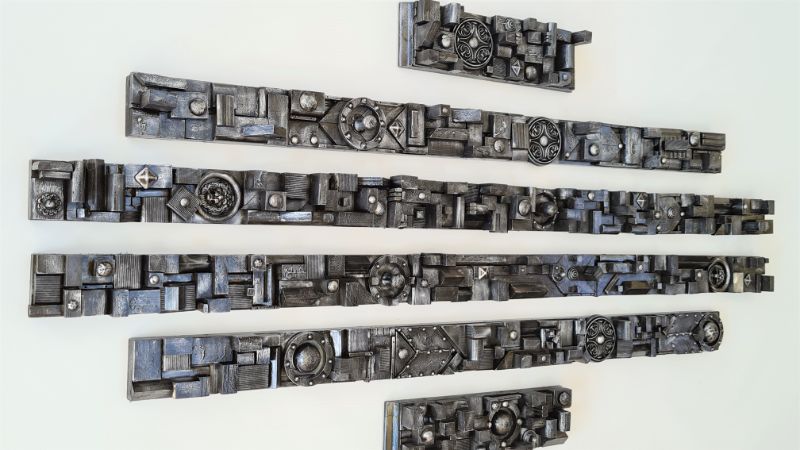
Close-Up Details
Taking photos outside was hard because the metallic wax reflected too much light, and the indoor lighting where I hung it is poor. Here are some close-up shots of the final finish.

You can hang these panels horizontally, vertically, or stagger them—whichever layout you find most appealing.

More scrap wood project ideas
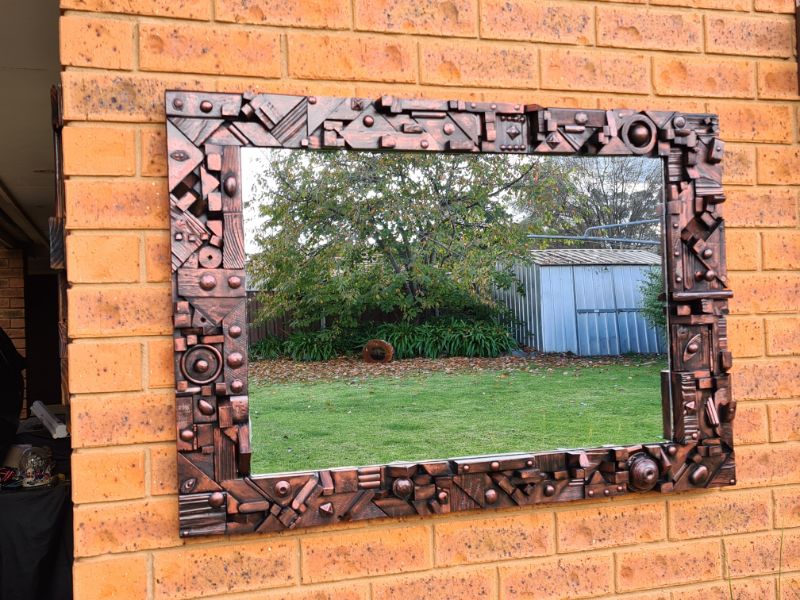
I used this same technique to create this mirror for my kitchen. You can also find inspiration in my other unique woodworking projects.
If you love this idea but aren’t into woodworking, you can achieve a similar effect by using cardboard instead.


If you’re interested in any of the items used in this project, we’d appreciate it if you used our affiliate links. Clicking these links earns us a small commission at no extra cost to you, helping us create more inspiring and exciting projects to share. We’d also love to hear your thoughts—feel free to leave a comment or share this post!


42 Comments
Lisa | Handmade in Israel
February 8, 2021 at 9:21 pmThis looks amazing! Thank you for sharing how you created it. #MMBC
Anita Holland
February 9, 2021 at 1:44 pmThank you so much.
Leanna
February 9, 2021 at 1:35 pmThis scrap wood project is beautiful, so intricate. We had a fence with boards cross ways to brace it until we put in a brand new one. This would have been pretty hanging outdoors. Beautiful idea.
Anita Holland
February 9, 2021 at 1:51 pmThank you Leanna, there are some many ways you can make these.
Anita Holland
February 9, 2021 at 1:43 pmThank you Karen
Carolina E Gonzalez
February 9, 2021 at 2:20 pmOkay Anita, you blew my mind away again!!! this is too amazing. I absolutely love it.
Anita Holland
February 10, 2021 at 7:19 pmThank you so much Caroline, I am so glad you liked it. One of my silly ideas that paid off in the end. lol
Cheryl
February 9, 2021 at 11:38 pmWow, I love what you did with scrap wood and things you had leftover! I am like you and keep all things, you never know when you will need them. Love how the silver makes everything pop!
Anita Holland
February 10, 2021 at 7:21 pmThank you so much Cheryl, It is so much fun trying to create from recycled materials. The waxes come in many colours so you are not limited to silver.
Sara
February 10, 2021 at 12:15 amGorgeous and I sure do envy your scrap pile 🙂
Anita Holland
February 10, 2021 at 7:22 pmThanks Sara, I dont even have to advertise for free scrap any more people in our town approach me now to take it first before they go to the tip. lol
Meshell Lane
February 10, 2021 at 2:52 amBeautiful!!!!
Anita Holland
February 10, 2021 at 7:22 pmThank you so much, Meshell.
Christina Woodcock
February 10, 2021 at 11:10 amAnita you know I am a BIG fan of your steampunk art! And I love this!
Anita Holland
February 10, 2021 at 7:23 pmThank you, Christina, It was not supposed to be steampunk, it just ended up with that look. It must be in my blood now. lol
Marie B.
February 11, 2021 at 1:57 amThis is amazing, Anita! I would have this hanging in my home in a heartbeat. I was admiring your sweet scrap wood stash too.
Anita Holland
February 11, 2021 at 9:59 amThank you so much Marie, It is hanging in my house now, did not have the heart to sell it. I love my scrap heap too and even nicer when it is all free.
Meegan
February 11, 2021 at 3:43 amWhat a great way to create a unique piece of art! You have so many incredible ideas, Anita. Thank you for always inspiring me to use my creativity and imagination.
Anita Holland
February 11, 2021 at 10:02 amThank you so much Meegan. I was so impressed with how it turned out because it was hard to see past the crappy process and imagine the outcome.
Kim Purvis
February 11, 2021 at 4:56 amVery cool wall art and I also love those planters! Pinned
Anita Holland
February 11, 2021 at 10:02 amThank you so much Kim, that is very kind of you to say.
Deana Landers
February 11, 2021 at 8:25 amAnita, you are amazingly creative. I can’t believe how you take scraps of things and turn them into such beautiful art. I love your work.
Anita Holland
February 11, 2021 at 10:06 amThank you so much Deana, that is an awesome compliment. I honestly believe building with scrap wood and materials gives you the courage to try new projects. The fear of failing is no longer there because there are no costs involved.
Anita Holland
February 11, 2021 at 10:01 amThank you so much.
Linda on All Things Kitchen
February 11, 2021 at 1:03 pmThat is so awesome. Thank you for sharing on the Classy Flamingos Blog Party.
Anita Holland
February 15, 2021 at 7:07 pmThank you so much.
Michelle Leslie
February 12, 2021 at 3:07 amOh, that’s STUNNING, Anita. WOW!!!!! It’s a work of art and what an amazing statement piece on any wall. One would never say it was made from wood scraps and other bits and bobs. Beautiful
Anita Holland
February 13, 2021 at 1:04 pmAww, thank you so much, Michelle. Your comment has made my day. xx
creativejewishmom/sara
February 14, 2021 at 4:36 amWow Anita this is fabulous, so creative and interesting!
Annn
February 14, 2021 at 11:58 amI love this, Anita, and what a great way to use those scraps! You will be featured on my blog Tuesday evening. Thank you for sharing at Party In Your PJ’s.
Cecilia
February 15, 2021 at 4:43 amHow cool, Anita! Thanks for sharing at Vintage Charm!
Anita Holland
February 15, 2021 at 7:08 pmThank you so much Cecilia, I will see you next week. lol
Naush Samama
February 15, 2021 at 4:18 pmAnita, this wall art is fantastic. Absolutely love it. You just NEVER cease to amaze me with your creativity.
Much love
Naush
Anita Holland
February 15, 2021 at 7:09 pmThank you Naush, what an awesome compliment hopefully I can keep them coming.
Julie Briones
February 16, 2021 at 5:15 pmAnita… your techniques for creating these lovely decor pieces amaze me! I’m happy to be featuring you at Tuesday Turn About this week!
Anita Holland
February 17, 2021 at 3:11 pmThank you so much Julie, that is very kind of you to say. And thank you for the feature.
Tuesday Turn About #87 February Fun - my wee abode
February 17, 2021 at 9:45 am[…] Creations by Anita uses on her steampunk decor items, you really need to pop on over and see! Anita creates unusual pieces out of crazy stuff! Seriously… take a […]
Marie - Interior Frugalista
February 20, 2021 at 2:35 amThanks for sharing your amazing scrap wood art with us at the Snickerdoodle Party, Anita. I am featuring you this weekend!
Anita Holland
February 22, 2021 at 2:40 pmThank you so much, Marie, I really do appreciate it. That project was a test that worked out great.
Anita Holland
February 22, 2021 at 2:41 pmThank you so much beth, I will be sure to add your party to my list.
Mohan Alankode
February 27, 2026 at 6:26 pmHair Anitha, I am Mohan, an artist from Kerala, India. Your wood works are excellent. Very creative. Inspired me a lot.Thanks for sharing the details.
Anita Holland
February 27, 2026 at 9:44 pmThank you so much.