
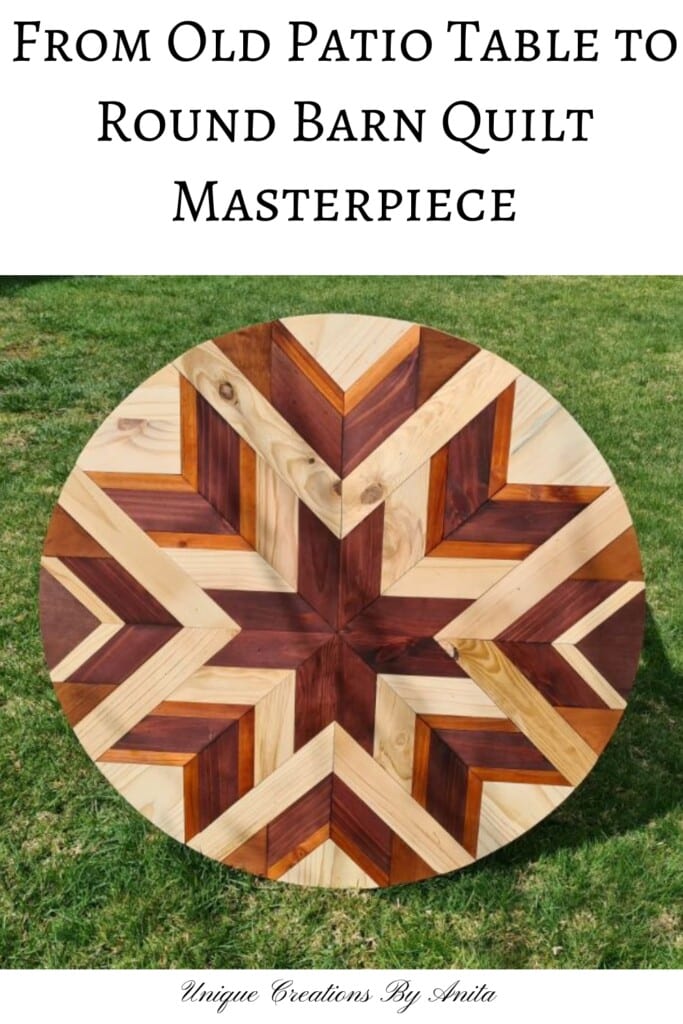
I built this scrap-wood round barn quilt table to thin out my overflowing timber offcuts and turn an old, weathered patio table into something striking. Barn quilts make brilliant scrap-busters and, because this design is round, it suits tabletops beautifully.

You’ll also see how I later transformed the finished table into a statement piece of wall art.

Before we dive into this tutorial, be sure to subscribe to my bimonthly newsletter to be the first to see my latest projects. You can also follow me on Pinterest and Facebook, where I also include my unique mixed-media art projects
P.S. I’m thrilled my blog was nominated for this year’s Amara Blog Awards in the Best Creative Skill category. If you enjoy my projects and can spare a minute, I’d be so grateful for your Vote.

Scrap-Wood Round Barn Quilt Table (Then Upcycled Into Wall Art)
**This post may contain affiliate links. This means I earn a small commission on links used at no extra cost to you. Please see my disclosure policy for more information.**
Materials you’ll need
- Old round table (sound frame preferred)
- Scrap timber (I used bed slats + mixed offcuts)
- Wood planer (optional but ideal)
- Orbital sander + sanding discs (80, 120, 180, 240 grit)
- Table saw and/or circular saw
- Mitre saw
- Wood glue + hot glue gun and sticks
- Wood stains (I used dark mahogany and cedar) + rags/brushes
- Masking tape or painters tape (layout helper)
- Benchtop sander or jigsaw for shaping edges
- Iron-on wood veneer edge tape + old iron (no steam)
- Soft cloth, utility knife, scouring pad
- Oil-based varnish (2–3 coats) + brush/foam applicator
- Clamps (optional)
- Safety gear: eye/ear protection, dust mask
What is a wooden barn quilt?
A barn quilt is a timber mosaic made from strips of wood cut at 45° to form simple shapes that slot neatly together. You can vary the strip widths and lengths, but keep the thickness the same so the surface stays even. Most patterns begin with a star at the centre. You repeat the same 45° units around that star, growing the design outward. Only when you reach the outer edge of the square do you add different pieces—small squares, triangles or diamonds—to complete the border. If you haven’t made a barn quilt yet, this small version is the perfect place to start.

Prepare the base
I started with a free, battered outdoor table. The frame was sturdy, so it made a perfect base. Remove loose finishes and grime. Check that the top is secure, or add screws from below so you have a solid surface for glueing.

Sort and prep the timber
I’m lucky—my son works for a builder and brings home offcuts that would otherwise hit the skip. I used mainly recycled bed slats for this barn quilt.

Most pieces looked rough, so I planed them to a uniform thickness. If you don’t have a planer, sand them flat and consistent. Keep a few extra pieces ready; consistent thickness matters for a flat tabletop where glasses won’t wobble.
Sand both sides before cutting. Because pieces often flip to fit angle patterns, sanding both sides saves time later.

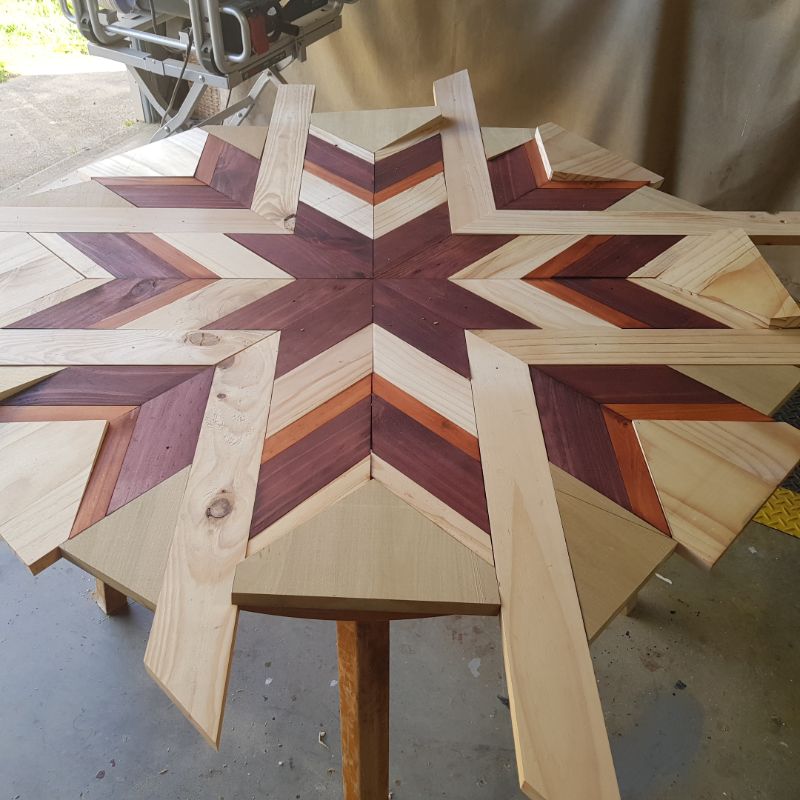
Plan the pattern
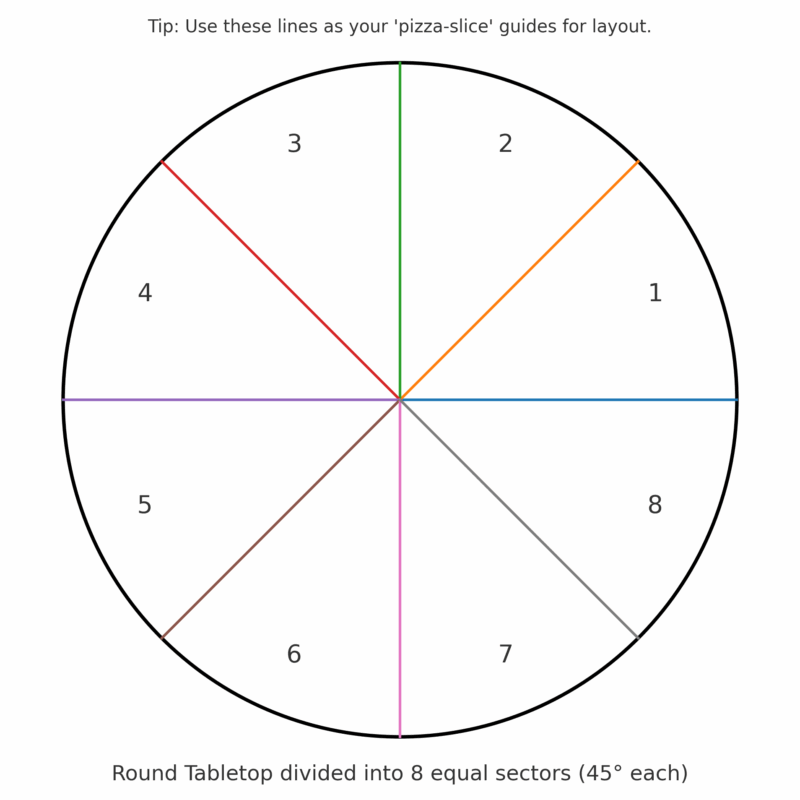
Lightly draw 8 “pizza-slice” guidelines from the centre to the rim. These keep the chevrons straight. I like starting with little “arrows”—two angled pieces forming a V. Make four identical arrows and place them on your guidelines. Keep everything dry-fit for now. You’ll glue once at least 80% of the layout feels locked in.
Cut consistent angles
Mix some narrower and wider strips; the size variation adds rhythm to the design while the identical angles keep the fit tight.

For this pattern, I cut every timber end at 45°. Estimating how much you’ll need is tricky, so I start with enough lengths to cover the tabletop one-and-a-half times. I usually have leftovers, which I turn into scrap-wood wall art—or I just keep making more barn quilts because they’re so addictive.

Set a stop block on the mitre saw for repeatable lengths, and mark the saw fence with a pencil line as a quick reference if you need extra parts later.

Once you have your wood cut, you can start creating your design.

Dry-fit the design
Build out from the centre, slotting arrows together along your pencil lines.

Keep adding chevron shapes in different thicknesses to the layout, working from the centre outwards. You don’t have to stick to this shape—rearrange the pieces in different ways, as shown here, while I moved the design around.

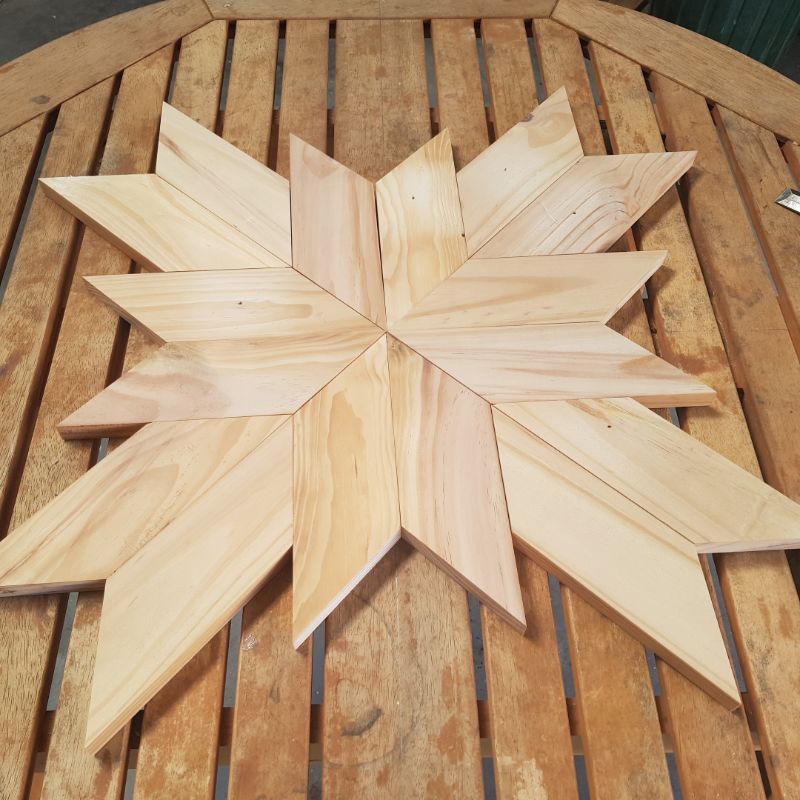
I kept shifting the pieces until the pattern felt right. This simple layout should be easy to follow from the photo below.

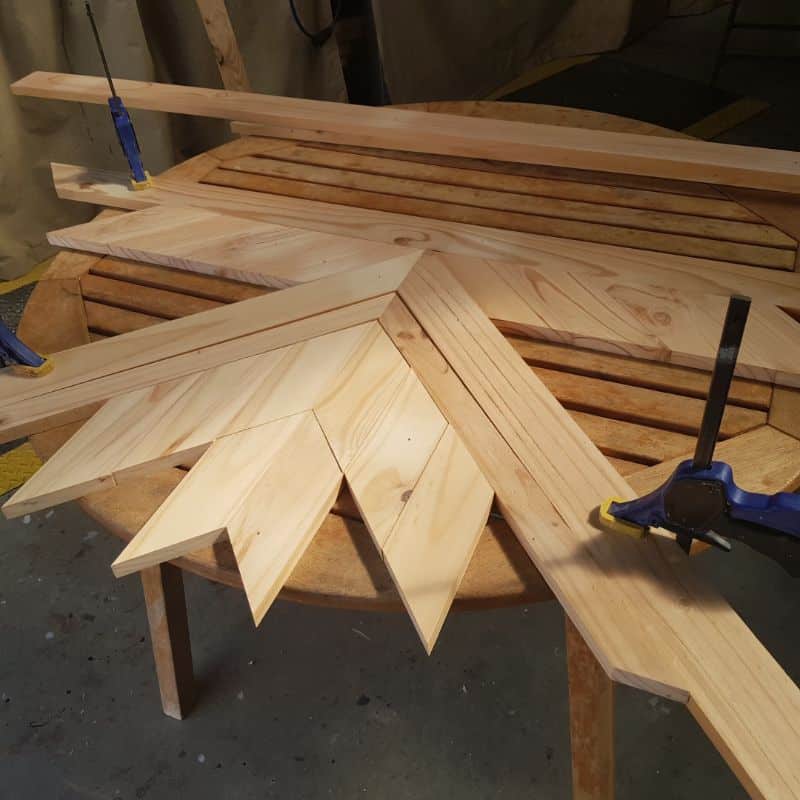
The design gets trickier as you reach the table’s curved edge. I left a slight overhang until the whole layout was complete. Even with careful alignment, mine drifted a few millimetres at the end, so I custom-cut the last pieces to fit the gaps. I ran out of matching timber and used a different species to fill the gaps.
It’s not a problem—if anything, it adds character to the final design. Before moving pieces for glueing, snap a quick photo so you can put everything back in the right order.

Staining the wood
This is the fun, creative stage. As you add colour, the pattern comes to life. Stain the edges of each piece as well—doing so helps disguise any tiny gaps.


I used dark mahogany, cedar stain and left some wood plain. Start in the middle and glue the wood to the table as you go along, using the pencil lines as a guide.
Glue the barn quilt top
I used wood glue for strength and a few hot-glue dots to tack pieces so I could keep moving. Start at the centre and work outwards, following your guidelines. Press each piece firmly and wipe the squeeze-out as you go. Keep checking lines—small nudges now save headaches later.

Shaping the last pieces
To get the round curve on the barn quilt table, each end piece must be cut to size. Put the piece of wood in place and use a pencil and draw a line on the bottom using the table shape as a guide.

I’m not great at cutting straight with a jigsaw, so I cheated and used a benchtop sander instead. I followed the pencil line and sanded away the excess. If you don’t have a benchtop sander, a hand sander works too.

Repeat this step for every piece. Please ignore the chaos in my workshop—lol.

How to add wood veneer tape
I wasn’t keen on the two-layer edge showing, so I finished it with iron-on wood veneer tape. I used an old iron—don’t use your best one, as the adhesive can transfer onto the soleplate.

Cut the veneer to the table’s circumference, leaving about 1 cm extra in case of shrinkage. I like a slight overhang at the top and bottom to guarantee full coverage. Hold the veneer in place, then press an iron (no steam) onto it for a few seconds to activate the adhesive. Work your way around the edge, repeating until the entire rim is covered.

I press the freshly heated veneer down with a soft cloth to ensure a firm bond. Then I trim the excess with a sharp utility knife for a clean edge.

To soften any sharp edges on the veneer tape, I lightly rub it with a scouring pad—it smooths the rim without scuffing the stain.

Seal for a durable finish
Two coats of oil-based varnish brought the colours to life and protected the top. Lightly sand between coats for a smooth result. I also sanded and sealed the legs so everything felt finished.

I sanded and sealed the legs of the table to finish it off.

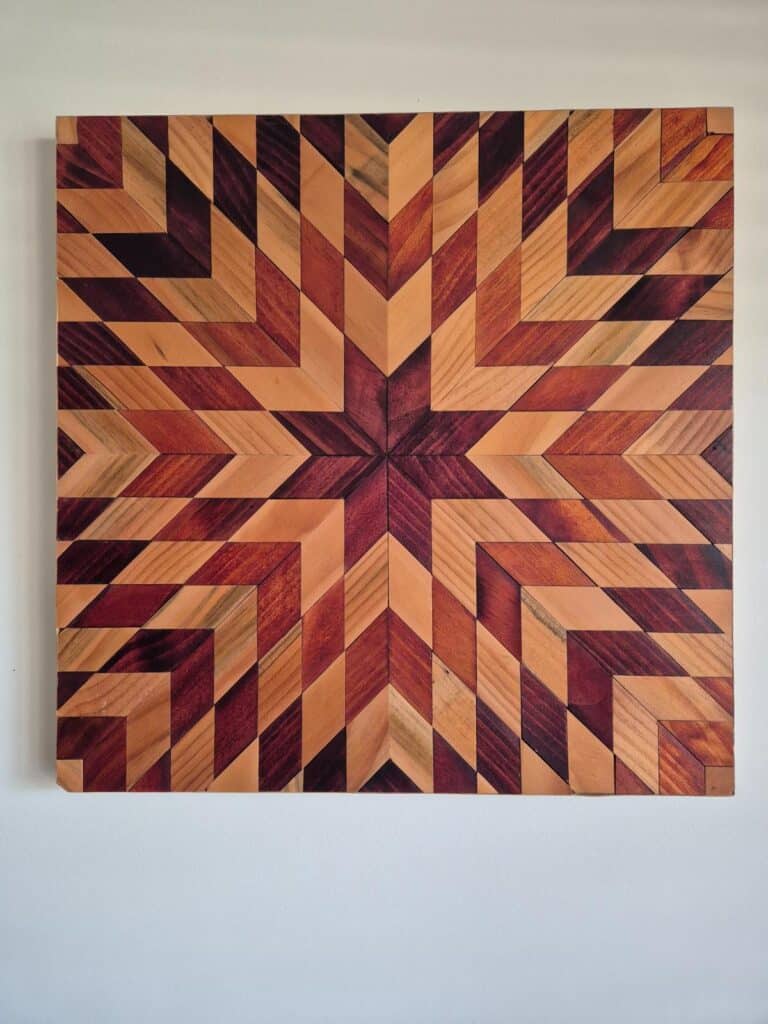
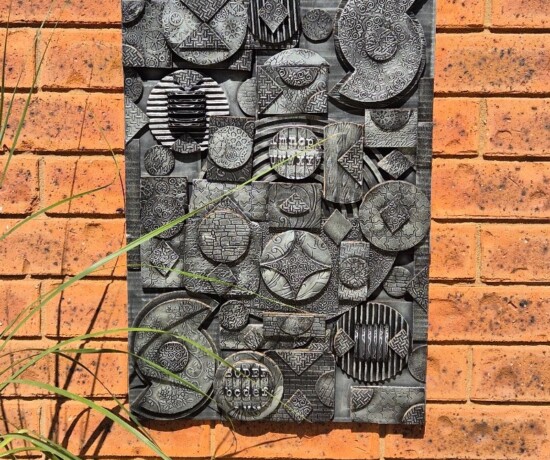
From table to wall art
Here’s the twist—buyers wanted a table with matching chairs, and the chairs in my photos were just my dining set. So I removed the top and hung it as a round barn quilt wall art in my lounge. It’s heavy, so I anchored it into the brick.

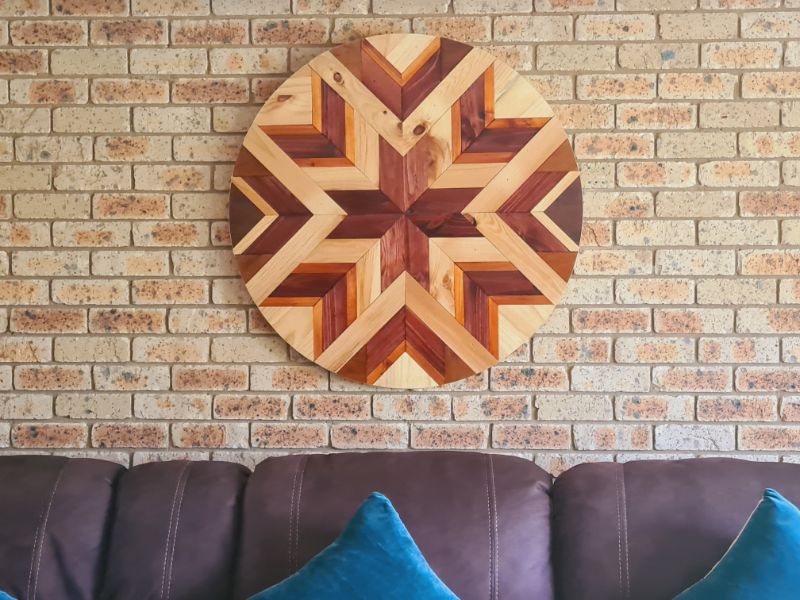
The piece on the right of the display was made from offcuts from earlier quilts—nothing wasted, just how I like it.

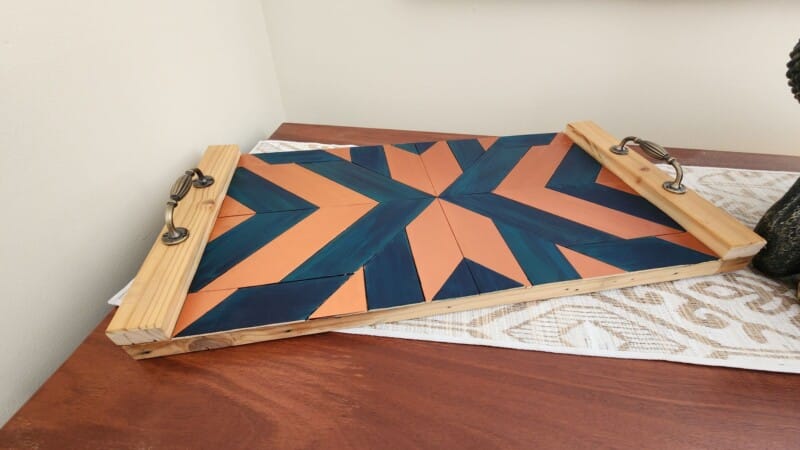
More Barn quilt project ideas
If you want to be more adventurous, this barn quilt headboard could be a great project. Try adding the Shou Sugi Ban wood-burning technique to your design.

I had some old horizontal wooden blinds that I repurposed to create this barn quilt tray.

If you’re interested in any of the items used in this project, we’d appreciate it if you used our affiliate links. Clicking these links earns us a small commission at no extra cost to you, helping us create more inspiring and exciting projects to share. We’d also love to hear your thoughts—feel free to leave a comment or share this post!

47 Comments
Michelle Leslie
December 28, 2020 at 11:01 pmI am completely blown away by your talent, Anita. WOW, WOW, WOW!!!! Your tutorials are really easy to follow and all the tips your share will make it so easy for me to attempt something like this. Incredible.
Oh and your fur babies are adorable <3
Anita Holland
December 31, 2020 at 10:40 amThank you so much Michelle, that is an awesome compliment. I agree my fur babies are just too adorable just naughty as hell. lol
Sara
December 29, 2020 at 12:24 amWow Anita! I LOVE how this looks hanging on the wall! I’ve always wanted to try this; I’m sure I’ll be back to re-read your tutorial!
Anita Holland
December 31, 2020 at 10:40 amThank you Sara, I think I prefer it as a wall hanging.
Helen Reynolds
December 29, 2020 at 5:10 amWow! That is amazing! Now I want a planner!
Anita Holland
December 31, 2020 at 10:41 amThank you so much Helen. You should get a planer they are amazing.
Helen Reynolds
December 29, 2020 at 5:11 am…and a planer. LOL
Anita Holland
December 31, 2020 at 10:41 amI knew what you ment. lol
Maria
December 29, 2020 at 5:46 amI am blown away by your talent. Do you sell them?
Anita Holland
December 31, 2020 at 10:43 amThank you so much Maria. I don’t make them to sell. I get an idea and just make it, if I don’t want it for my house then I sell it. I don’t have the confidence to make to order.
Lauren Sparks
December 29, 2020 at 7:00 amI am so impressed. That is gorgeous! Visiting you from the good random fun link up.
Anita Holland
December 31, 2020 at 10:43 amThank you so much Lauren.
Dee | Grammy's Grid
December 30, 2020 at 12:22 amOh, WOW! How pretty is that? Thanks so much for linking up with me at the #UnlimitedMonthlyLinkParty 20, open until January 26. Shared on social media.
Anita Holland
December 31, 2020 at 10:43 amThank you so much, I was super happy with the outcome.
Libbie@alifeunfolding
December 30, 2020 at 1:09 amAnita!!!! This is simply stunning!!!!!!
Anita Holland
December 31, 2020 at 10:44 amThank you Libbie, that is so kind of you to say.
Meegan
December 30, 2020 at 4:29 amI just love when you can make something from scraps or practically nothing. You most certainly have a beautiful talent of doing just that. The table and style are absolutely amazing. From the various wood colors to the pattern to the finished project-it is stunning!
Anita Holland
December 31, 2020 at 10:45 amThank you Meegan. Building from recycled makes the project more exciting for me.
Sew Crafty Crochet
December 30, 2020 at 10:26 amThis table is so beautiful! I love the design and the different color stains. Gorgeous!
Anita Holland
December 31, 2020 at 10:45 amThank you so much.
Karen the next best thing to mummy
December 30, 2020 at 11:02 pmI love this as it is so unique #alittlebitofeverything@_karendennis
Rebecca Payne
December 31, 2020 at 1:59 amSo Cute! Happy New Year!
Anita Holland
December 31, 2020 at 10:45 amThank you Rebecca, have a happy new year.
Jeanne
December 31, 2020 at 3:13 amOMG, this is so beautiful! I have done quilting, and I know making “quilts” in wood is way harder than that! Women aren’t often encouraged to work in wood, nor do they typically have the right equipment and knowledge, so you are an inspiration as well!
Anita Holland
December 31, 2020 at 10:47 amThank you so much Jeanne, they look harder than they really are. I do think more women are starting to do woodwork now, and having the right tools makes it so much easier.
Julie
January 3, 2021 at 4:15 amThis is stunning, It’ll be one of the features at Handmade Monday this week 🙂
Anita Holland
January 7, 2021 at 1:39 pmThank you so much.
Annette, 3 Little Buttons
January 4, 2021 at 1:34 amWow. Just WOW! I cannot believe how talented you are. It looks stunning and something that I would have thought you’d only find in a boutique store. #Alittlebitofeverything
Anita Holland
January 7, 2021 at 1:40 pmThank you so much Annette, that is an amazing compliment.
Linda Primmer
January 4, 2021 at 3:57 amAnita, this is amazing. I am blown away by your skills. Gorgeous! I am happy to feature this masterpiece on Sunday at Love Your Creativity. Happy New year.
Anita Holland
January 7, 2021 at 1:41 pmThank you so much for the great compliment and for the awesome feature.
Michele Michael
January 4, 2021 at 9:38 pmA stunning piece . Thanks for sharing at Funtastic Friday.
Anita Holland
January 7, 2021 at 1:42 pmThank you so much Michele.
Marie B.
January 5, 2021 at 3:13 amYou are a gal who can rock the power tools! This is stunning, Anita! All those angles make my head hurt but you make it look so easy. It looks gorgeous hanging on the brick wall in your lounge too.
Anita Holland
January 7, 2021 at 1:44 pmThank you so much my friend, I must admit I do love it as a wall hanging.
Grandma's House DIY
January 5, 2021 at 3:55 amHope you had a great new year, I’ll be featuring you this week. See you next time at the To Grandma’s house we go link party!
Julie
January 6, 2021 at 10:51 amWOW o WOW indeed! I have the Lone Star quilt and yet doesn’t compare to this BEAUTIFUL table. My goodness this is gorgeous! and the attention to detail as it looks perfect………….hats off to you!!
Anita Holland
January 7, 2021 at 1:46 pmThank you so much Julie. I have done a few now and this one turned out the best.
Marilyn Lesniak
January 8, 2021 at 11:37 amThank you for sharing at #OverTheMoon. Pinned and shared. Have a lovely week. I hope to see you at next week’s party too! Please stay safe and healthy. Come party with us at Over The Moon! Catapult your content Over The Moon! @marilyn_lesniak @EclecticRedBarn
Amy
January 9, 2021 at 4:55 pmWow, just wow! I love your round barn quilt table. It is amazing. Found you at To Grandma’s House we go.
Anita Holland
January 12, 2021 at 5:12 pmThank you so much Amy, I really do appreciate your great comment.
Naush Samama
January 12, 2021 at 4:13 amAnita, the makeover is absolutely fabulous. Thank you for sharing the step by step pictures of the tutorial. Congratulations – you are one of our features at Meraki Link Party 19.
Naush
Anita Holland
January 12, 2021 at 5:15 pmThank you so much Naush, for the great comment and for the feature on my project.
Dee | Grammy's Grid
January 26, 2021 at 8:25 pmCONGRATS! Your post is FEATURED at my #UnlimitedMonthlyLinkParty 21, open until February 26.
Anita Holland
January 27, 2021 at 12:01 pmThank you so much Dee.
Anne
August 21, 2021 at 10:02 amTruly stunning!
Anita Holland
August 21, 2021 at 6:40 pmThank you so much.